
1. Introduction
This documentation explains the integration and configuration for implementing Chirp Notifications. Chirp Notifications are a collection of financial activities Powered by Chirp's Instant Financial Verification product.
Chirp Notifications can be configured for one or multiple Chirp Profiles. Please contact us via [email protected] to find out more about how to configure Chirp Notifications and for any other questions regarding Chirp.
2. Notification Channels
Currently there are two primary notification channels for configuring and receiving Chirp Notifications:
- Webhooks
These two primary notification channels are not mutually exclusive so configure one or both of them based on the needs of your business workflow and processes
eMail notifications are primarily used when there’s no integrated systems to receive and process the webhook notifications from Chirp.
Webhook Notifications are to be used with Chirp integrated partners and require a POST callback URL for sending payload notifications. The webhook provided should be configured to respond with an appropriate HTTP status code for status tracking and updates.
3. Notification Types
Currently Chirp Notifications offers 11 types of notification.
- BALANCE
- DEPOSIT
- ACC_CONNECTION_STATUS
- REQUEST_STATUS
- REFRESH_STATUS
- KEYWORD
- UNSUPPORTED_BANK
- EXPORT_DATA
- XTRAHISTORY_STATUS
- TP_STATUS_UPDATE
- TP_DATA_ANALYSIS
3.1. BALANCE
BALANCE sends notifications regarding the available balance in the connected financial institution accounts. Balance alerts will be sent only when the configured rules are met. Webhook Balance Notifications can be used by integrated partners to trigger customized workflows. For instance, if a balance notification rule is configured to send notifications when the account balance is less than $20, Chirp Notifications will be sent via each configured Notification Channel when any connected accounts balance is less than $20.
3.1.1. eMail Balance Notification
Sample eMail Balance Notification
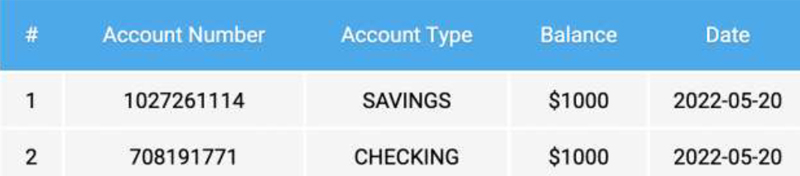
Figure 3.1
3.1.2. Webhook Balance Notification
Sample Webhook Balance notification
{
    "requestCode": "QLU0GU",
    "type": "BALANCE",
    "notificationId" : "XXXXXXYYYYYYZZZZZZ123456",
    "payload": [
            {
                "account_number": "XXXXXXXXX",
                "balance": 1000,
                "name": "Savings",
                "type": "SAVINGS",
                "updated_at": "2022-05-20T06:50:15Z"
            },
            {
                "account_number": "XXXXXXXXXX",
                "balance": 1000,
                "name": "Checking",
                "type": "CHECKING",
                "updated_at": "2022-05-20T06:50:15Z"
            }
            ]
}
| # | Field Name | Description |
|---|---|---|
| 1 | requestCode | Request code for which the balance notification is triggered |
| 2 | type | Type of the notification triggered |
| 3 | payload | Payload data transmitted |
| 4 | notificationId | A unique id for a notification |
3.2. DEPOSIT
DEPOSIT sends notifications regarding deposits that are recorded in the connected financial institution accounts. Deposit alerts will be sent only when the configured rules are met. Webhook Deposit Notifications can be used by integrated partners to trigger customized workflows. For instance, if a deposit notification rule is configured to send notifications when a new deposit greater than $70 is recorded in the account, Chirp Notifications will be sent via each configured Notification Channel when a new deposit greater than $70 is recorded in the connected accounts.
3.2.1. eMail Deposit Notification
Sample eMail Deposit Notification
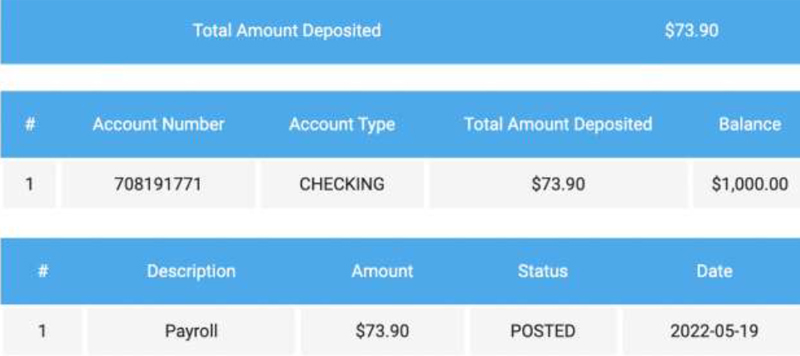
Figure 3.2
3.2.2. Webhook Deposit Notification
Sample Webhook Deposit Notification
{
"requestCode": "QLU0GU",
"type": "DEPOSIT",
"notificationId" : "XXXXXXYYYYYYZZZZZZ123456",
"payload" : {
    allAccounts: [
        {
            accountName: 'Checking',
            accountType: 'CHECKING',
            accountGuid: 'ACT-XXXXXXXXXXXXXXXXXXXXX',
            accountNumber: 'XXXXXXXXXX',
            accountBalance: 1000,
            currentBalance: 1000,
            availableBalance: 1000,
            depFilteredTrans: [
                {
                    "category":"Transfer",
                    "created_at":"2022-08-10T10:14:36Z",
                    "date":"2022-08-09",
                    "posted_at":"2022-08-10T12:00:00Z",
                    "status":"POSTED",
                    "top_level_category":"Transfer",
                    "transacted_at":"2022-08-09T12:00:00Z",
                    "type":"CREDIT",
                    "updated_at":"2022-08-10T10:14:36Z",                                         		                            "account_guid":"ACT-XXXXXXXXXXXXXX",
                    "account_id":"act-6744344",
                    "amount":17.46,
                    "category_guid":"CAT-XXXXXXXXXXXXX",
                    "check_number_string":null,
                    "currency_code":"USD",
                    "description":"Transfer From Checking",
                    "extended_transaction_type":"",
                    "guid":"TRN-XXXXXXXXXXXXXXXXXXXXXXXXXXXXXX",
                    "id":"transfer-XXXXXXXXXXXXXXXXXXXXXXXXXXXXXXX",
                    "is_expense":true,
                    "is_fee":false,
                    "is_income":false,
                    "is_international":null,
                    "is_recurring":null,
                    "latitude":null,
                    "localized_description":null,
                    "localized_memo":null,
                    "longitude":null,
                    "member_guid":"MBR-XXXXXXXXXXXXXXXXXXXXXXXXXX",
                    "member_is_managed_by_user":true,
                    "memo":null,
                    "merchant_category_code":0,
                    "merchant_guid":null,
                    "merchant_location_guid":null,
                    "metadata":null,
                    "original_description":"Savings Transfer from Checking",
                    "user_guid":"USR-XXXXXXXXXXXXXXXXXXXXXXXXXX",
                    "user_id":"XXXXXXXXXXXXXXXXXXXXXXXXXXXXXXXX",
                    "is_bill_pay":false,
                    "is_direct_deposit":false,
                    "is_overdraft_fee":false,
                    "is_payroll_advance":false,
                    "is_subscription":false,
                    "categoryCode":"TRF",
                    "parentCategoryCode":"TRF"
                    }
            ],
            depositTransactionsAmount: 0
        },
    ],
        totalDepositTransactions: [
            {
                "category":"Transfer",
                "created_at":"2022-08-10T10:14:27Z",
                "date":"2022-08-09",
                "posted_at":"2022-08-10T12:00:00Z",
                "status":"POSTED",
                "top_level_category":"Transfer",
                "transacted_at":"2022-08-09T12:00:00Z",
                "type":"CREDIT",
                "updated_at":"2022-08-10T10:14:27Z",
                "account_guid":"ACT-XXXXXXXXXXXXXXXXXX",
                "account_id":"act-XXXXXXX",
                "amount":11.71,
                "category_guid":"CAT-XXXXXXXXXXXXXXXXXXXXXXXXXX",
                "check_number_string":null,
                "currency_code":"USD",
                "description":"Transfer",
                "extended_transaction_type":"",
                "guid":"TRN-XXXXXXXXXXXXXXXXXXXXXXXXXXXXXXX",
                "id":"transfer-XXXXXXXXXXXXXXXXXXXXXXXXXXXXXX",
                "is_expense":true,
                "is_fee":false,
                "is_income":false,
                "is_international":null,
                "is_recurring":null,
                "latitude":null,
                "localized_description":null,
                "localized_memo":null,
                "longitude":null,
               "member_guid":"MBR-XXXXXXXXXXXXXXXXXXX",
                "member_is_managed_by_user":true,
                "memo":null,
                "merchant_category_code":0,
                "merchant_guid":null,
                "merchant_location_guid":null,
                "metadata":null,
                "original_description":"Transfer",
                "user_guid":"USR-XXXXXXXXXXXXXXXXXXXXXXX",
                "user_id":"XXXXXXXXXXXXXXXXXXXXXX",
                "is_bill_pay":false,
                "is_direct_deposit":false,
                "is_overdraft_fee":false,
                "is_payroll_advance":false,
                "is_subscription":false,
                "categoryCode":"TRF",
                "parentCategoryCode":"TRF"
                }
        ],
            totalDepositTransactionAmount: 106.26

}
}
| # | Field Name | Description |
|---|---|---|
| 1 | requestCode | Request code for which the balance notification is triggered |
| 2 | type | Type of the notification triggered |
| 3 | payload | Payload data transmitted |
| 4 | notificationId | A unique id for a notification |
3.3. ACC_CONNECTION_STATUS
ACC_CONNECTION_STATUS sends notifications regarding a persons’ financial institution connection status changes and updates. Account Connection Status has only one rule to configure which is REMOVED. The REMOVED rule is created to sends notifications when a persons’ accounts are disconnected from the financial institution. For instance, if a person changes their password, revokes OAuth access or closes the connected account with the financial institution, then the connection with their financial institution gets disconnected and the persons’ account data can no longer be accessed. Chirp Notifications will be sent via each configured Notification Channel when the account is no longer accessible with the financial institution.
3.3.1. eMail Account Connection Status Notification
Sample eMail Account Connection Status Notification

Figure 3.3
3.3.2. Webhook Account Connection Status Notification
Sample Webhook Account Connection Status Notification
{
    requestCode: “QLU0GU”,
    type: "ACC_CONNECTION_STATUS",
    connectionStatus: "REMOVED",
    description: “The customer's financial account is no longer connected. As a result the customer has
    been unsubscribed on your behalf.”
}
| # | Field Name | Description |
|---|---|---|
| 1 | requestCode | Request code for which the balance notification is triggered |
| 2 | type | Type of the notification triggered |
| 3 | connectionStatus | Updated connection status |
| 4 | description | Detailed description of the updated connection status |
3.4. REQUEST_STATUS
REQUEST_STATUS sends notifications regarding the status of a request whenever there is an update. REQUEST_STATUS Notifications can be used by integrated partners in their customized workflows as needed. This notification type can be configured on entity, user and profile levels individually. If a configuration is added on an entity level, then notifications are sent for all requests created by users associated with the entity. Profile level configuration overrides entity level notifications for applicable requests. User level configuration overrides both entity and profile level notifications for applicable requests. Customer level notifications overrides all the levels for applicable requests.
Steps for REQUEST_STATUS
1. Login to the Portal:
- Use your credentials to log in to the Portal. Ensure that you have Entity Admin privileges or a manager role to access the necessary settings.
2. Access the Notifications Settings:
- Once logged in, you will be directed to the portal dashboard.
- Find the "Settings" option in the left-hand navigation menu and click on it to expand the menu.
3. Navigate to Notifications:
- From the expanded menu, locate and click on the "Notifications" option. This will take you to the notification’s settings page.
4. Add a New Notification:
- On the notification’s settings page, you will find an option to "Add Notification." Click on this option to proceed with creating a new notification.
5. Select Notification Type:
- Look for the "Type" dropdown menu and choose "REQUEST_STATUS" from the available options. This ensures that the notification will be triggered specifically for request status updates.
6. Choose Recipients (Optional):
- There are two checkboxes labelled "User" and "Profile." If you want to receive updates for all requests, leave both checkboxes unchecked. Otherwise, if you want to restrict notifications to specific users or profiles, you can select accordingly.
7. Configure Notification Method:
- In the notification configuration section, choose the "Notify via Webhook" option. This is the method through which you will receive the requested status updates.
8. Provide Webhook URL:
- Enter the valid webhook URL in the designated field. This is where the notification data will be sent whenever a request status changes. A maximum of two URLs can be configured.
9. Activate the Notification:
- Check the "Active" checkbox to enable the notification. This ensures that the notification system will actively monitor and send updates for request status changes.
10. Save Settings:
- Once all the necessary details are entered and configurations are set, locate the "Save" button on the page. Click on it to save your notification settings.
3.4.1. eMail Request Status Notification
Sample eMail Request Status Notification
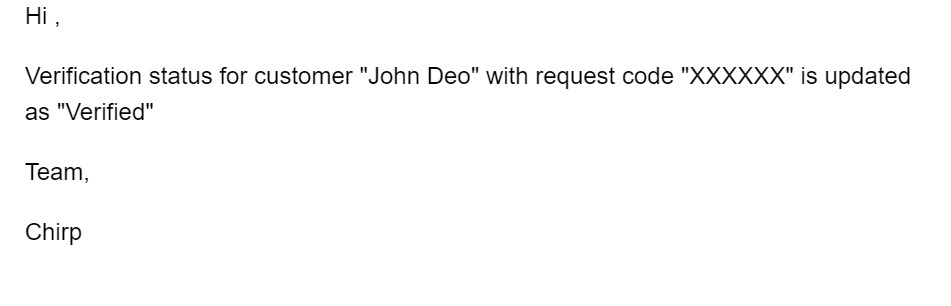
Figure 3.4
3.4.2. Webhook Request Status Notification
Sample Webhook Request Status Notification
 {
     "requestCode": "QLU0GU",
     "type": "REQUEST_STATUS",
     "action": "UPDATED",
     "status": "Verified",
     "firstName": "John",
     "lastName": "Deo",
     "customerId": "YYYYY",
     "productId": "ZZZZZ",
     "statusDetails": "NA"
 }
| # | Field Name | Description |
|---|---|---|
| 1 | requestCode | Request code for which the request notification is triggered |
| 2 | type | Type of the notification triggered |
| 3 | action | Type of the action |
| 4 | status | Status of a request - ”Unverified”, “Verified”, “Attempted”, “Rejected”, “Expired” |
| 5 | firstName | Customer's first name |
| 6 | lastName | Customer's last name |
| 7 | customerId | Unique ID of a customer saved in a system which integrates Chirp via API |
| 8 | productId | Unique ID of a customer record used in the LMS. This could be a loan ID or application ID associated with the customer in the LMS |
| 9 | statusDetails | Status details of the request code passed - ”Unverified - No Customer Action”, “Unverified - Incomplete Customer Action”, “Attempted - Bank Error”, “Attempted - In Progress”, “Attempted - Credential Error” |
3.5. REFRESH_STATUS
REFRESH_STATUS sends notifications regarding the refresh status of request during bank refresh. REFRESH_STATUS Notifications can be used by integrated partners in their customized workflows. This notification type can be configured on entity, user and profile levels individually. If a configuration is added on an entity level, then notifications are sent for all requests created by users associated with the entity. Profile level configuration overrides entity level notifications for applicable requests. User level configuration overrides both entity and profile level notifications for applicable requests. Customer level notifications overrides all the levels for applicable requests.
Steps for REFRESH_STATUS
1. Login to the Portal:
- Use your credentials to log in to the Portal. Ensure that you have Entity Admin privileges or a manager role to access the necessary settings.
2. Access the Notifications Settings:
- Once logged in, you will be directed to the portal dashboard.
- Find the "Settings" option in the left-hand navigation menu and click on it to expand the menu.
3. Navigate to Notifications:
- From the expanded menu, locate and click on the "Notifications" option. This will take you to the notification’s settings page.
4. Add a New Notification:
- On the notification’s settings page, you will find an option to "Add Notification." Click on this option to proceed with creating a new notification.
5. Select Notification Type:
- Look for the "Type" dropdown menu and choose "REFRESH_STATUS" from the available options. This ensures that the notification will be triggered specifically for refresh status updates.
6. Choose Recipients (Optional):
- There are two checkboxes labelled "User" and "Profile." If you want to receive updates for all requests, leave both checkboxes unchecked. Otherwise, if you want to restrict notifications to specific users or profiles, you can select accordingly.
7. Configure Notification Method:
- In the notification configuration section, choose the "Notify via Webhook" option. This is the method through which you will receive the refresh status updates.
8. Provide Webhook URL:
- Enter the valid webhook URL in the designated field. This is where the notification data will be sent whenever a refresh status changes. A maximum of two URLs can be configured.
9. Activate the Notification:
- Check the "Active" checkbox to enable the notification. This ensures that the notification system will actively monitor and send updates for refresh status changes.
10. Save Settings:
- Once all the necessary details are entered and configurations are set, locate the "Save" button on the page. Click on it to save your notification settings.
3.5.1. Webhook Refresh Status Notification
Sample Webhook Refresh Status Notification
 {
     "requestCode": "QLU0GU",
     "type": "REFRESH_STATUS",
     "action": "UPDATED",
     "status": "Success",
     "firstName": "John",
     "lastName": "Deo",
     "customerId": "YYYYY",
     "productId": "ZZZZZ"
 }
| # | Field Name | Description |
|---|---|---|
| 1 | requestCode | Request code for which the refresh notification is triggered |
| 2 | type | Type of the notification triggered |
| 3 | action | Type of the action |
| 4 | status | Refresh status of a request - "Success" or "Failed" |
| 5 | firstName | Customer's first name |
| 6 | lastName | Customer's last name |
| 7 | customerId | Unique ID of a customer saved in a system which integrates Chirp via API |
| 8 | productId | Unique ID of a customer record used in the LMS. This could be a loan ID or application ID associated with the customer in the LMS |
3.6. KEYWORD
KEYWORD type notifications can be utilized for notifying about specific transactions based on the match of the description to specified keywords. Keyword alerts will be sent only when the configured rules are met. For instance, if a keyword notification rule is configured to send notifications about transactions that contain any of the keywords that were configured, Chirp Notifications will be sent via each configured Notification Channel about transactions that have any of the configured keywords in the description.
Steps for KEYWORDS
1. Login to the Portal:
- Use your credentials to log in to the Portal. Ensure that you have Entity Admin privileges or a manager role to access the necessary settings.
2. Access the Notifications Settings:
- Once logged in, you will be directed to the portal dashboard.
- Find the "Settings" option in the left-hand navigation menu and click on it to expand the menu.
3. Navigate to Notifications:
- From the expanded menu, locate and click on the "Notifications" option. This will take you to the notification’s settings page.
4. Add a New Notification:
- On the notification’s settings page, you will find an option to "Add Notification." Click on this option to proceed with creating a new notification.
5. Select Notification Type:
- From the "Type" dropdown, choose "KEYWORDS" to set up notifications triggered by specific keywords.
6. Choose Recipients (Optional):
- Indicate who should receive these keyword-triggered notifications. If you want to notify all relevant parties, select “Apply for all profiles” checked.
7. Configure Notification Method:
- Choose the "Notify via Webhook" option to activate webhook-based notifications.
8. Provide Webhook URL:
- Input the valid webhook URL into the provided field. This URL will be used to send notification data whenever a keyword match occurs.
9. Add Keywords for Matching:
- After selecting the type “KEYWORDS”, an additional input field labelled "Keywords" will appear.
- Enter the keywords you want to monitor for. Separate multiple keywords using a comma or press enter after each keyword.
10. Activate the Notification:
- Ensure the "Active" checkbox is selected to enable the notification system.
11. Save Your Settings:
- Once all details and configurations are entered, click "Save" to store the notification setup.
12. Using "KEYWORDS" Notifications:
- With the "KEYWORDS" notification set up, the system will monitor descriptions for the specified keywords.
- Whenever a description contains any of the provided keywords, the notification will be triggered.
- The relevant information will be sent to the webhook URL you configured.
3.6.1. eMail Notification
Sample eMail Notification

Figure 3.6
3.6.2. Webhook Notification
Sample Webhook Notification
            {
              "requestCode": "QLU0GU",
              "type": "KEYWORD",
              "notificationId" : "XXXXXXYYYYYYZZZZZZ123456",
              "payload": {
                "_id": "12132123123123123123",
                "transactions": [
                  {
                    "_id": "12132123123123123123",
                    "category": "Hair",
                    "date": "2023-06-01",
                    "status": "POSTED",
                    "type": "DEBIT",
                    "account_guid": "ACT-6344474d-4715-49b5-ab09-cbc41cef0c50",
                    "account_id": "act-223434333",
                    "amount": 5.79,
                    "currency_code": "USD",
                    "description": "Regis Salon",
                    "is_direct_deposit": false,
                    "is_expense": true,
                    "is_fee": false,
                    "is_income": false,
                    "is_overdraft_fee": false,
                    "is_payroll_advance": false,
                    "is_recurring": null,
                    "is_subscription": false,
                    "memo": null,
                    "transacted_at" : "2023-06-29T11:59:59Z",
                    "requestCode": "QLU0GU",
                    "entityId": "5ff1e1d0d4234b02da121213e",
                    "profileId": "5ff1e1d0d4234b02ddq3e3d2",
                    "addedOn": "2023-06-12T06:18:30.545Z",
                    "modifiedOn": "2023-06-12T06:18:30.545Z",
                    "__v": 0
                  }
                ],
                "allAccounts": [
                  {
                    "accountName": "Checking",
                    "accountType": "CHECKING",
                    "accountNumber": "708191771",
                    "depFilteredTrans": [
                      {
                        "_id": "12132123123123123123",
                        "category": "Hair",
                        "date": "2023-06-01",
                        "status": "POSTED",
                        "type": "DEBIT",
                        "amount": 5.79,
                        "currency_code": "USD",
                        "description": "Regis Salon",
                        "is_direct_deposit": false,
                        "is_expense": true,
                        "is_fee": false,
                        "is_income": false,
                        "is_overdraft_fee": false,
                        "is_payroll_advance": false,
                        "is_recurring": null,
                        "is_subscription": false,
                        "memo": null,
                        "transacted_at" : "2023-06-29T11:59:59Z",
                        "requestCode": "QLU0GU",
                        "entityId": "5ff1e1d0d4234b02da121213e",
                        "profileId": "5ff1e1d0d4234b02ddq3e3d2",
                        "addedOn": "2023-06-12T06:18:30.545Z",
                        "modifiedOn": "2023-06-12T06:18:30.545Z",
                        "__v": 0
                      }
                    ]
                  }
                ]
              }
            }
| # | Field Name | Description |
|---|---|---|
| 1 | requestCode | Request code for which the keyword notification is triggered |
| 2 | type | Type of the notification triggered |
| 3 | payload | Payload data transmitted |
| 4 | notificationId | A unique id for a notification |
3.7. UNSUPPORTED_BANK
UNSUPPORTED_BANK sends notifications when the end customer selects an unsupported bank that was configured in the Blocked Banks under Data Maintenance for that Entity. There is only one rule for this notification type which is TRIGGERED
Steps for UNSUPPORTED_BANK
1. Login to the Portal:
- Use your credentials to log in to the Portal. Ensure that you have Entity Admin privileges or a manager role to access the necessary settings.
2. Access the Notifications Settings:
- Once logged in, you will be directed to the portal dashboard.
- Find the "Settings" option in the left-hand navigation menu and click on it to expand the menu.
3. Navigate to Notifications:
- From the expanded menu, locate and click on the "Notifications" option. This will take you to the notification’s settings page.
4. Add a New Notification:
- On the notification’s settings page, you will find an option to "Add Notification." Click on this option to proceed with creating a new notification.
5. Select Notification Type:
- In the "Type" dropdown, choose "UNSUPPORTED_BANK" to ensure that this notification triggers for unsupported bank selections.
6. Choose Recipients (Optional):
- Determine who should receive these notifications. If you want to notify all parties about unsupported bank selections, select “Apply for all profiles” checked.
7. Configure Notification Method:
- opt for the "Notify via Webhook" option to trigger notifications via a webhook whenever an unsupported bank is selected.
8. Provide Webhook URL:
- Input the valid webhook URL into the provided field. This URL will be used to send notification data when an unsupported bank is selected.
9. Activate the Notification:
- Ensure the "Active" checkbox is selected to enable the notification system.
10. Save Your Settings:
- Once all details and configurations are entered, click "Save" to store the notification setup.
11. Utilizing "UNSUPPORTED_BANK" Notifications:
- Now, when a user selects an unsupported bank during the bank selection process, the notification system will be triggered.
- A notification will be sent to the webhook URL you provided, containing relevant information about the unsupported bank selection.
3.7.1. Webhook Unsupported Bank Notification
Sample Webhook for UNSUPPORTED_BANK Notification
            {
              requestCode: “QLU0GU”,
              type: "UNSUPPORTED_BANK",
              description: “The customer selected <bank name> during verification
                            but it’s blocked per your unsupported bank configuration.”
            }
3.8. EXPORT_DATA
The "EXPORT_DATA" notification type allows you to configure notifications for exporting request data as a CSV file. This is particularly useful for tracking and storing historical data for the past 60 days.
Steps for EXPORT_DATA
1. Login to the Portal:
- Use your credentials to log in to the Portal. Ensure that you have Entity Admin privileges or a manager role to access the necessary settings.
2. Access the Notifications Settings:
- Once logged in, you will be directed to the portal dashboard.
- Find the "Settings" option in the left-hand navigation menu and click on it to expand the menu.
3. Navigate to Notifications:
- From the expanded menu, locate and click on the "Notifications" option. This will take you to the notification’s settings page.
4. Add a New Notification:
- On the notification’s settings page, you will find an option to "Add Notification." Click on this option to proceed with creating a new notification.
5. Select Notification Type:
- In the "Type" dropdown, choose "EXPORT_DATA" to set up notifications for exporting data.
6. Choose Recipients (Optional):
- Determine who should receive these export notifications. If you want to notify all parties about data exports, select "Apply for all profiles" checked.
7. Configure Notification Method:
- Opt for the "Notify via Email" option to trigger notifications via email when data export occurs. Alternatively, you can choose "Notify via Webhook" if you prefer to use a webhook.
8. Provide Email Address or Webhook URL:
- If you selected "Notify via Email", input the valid email address into the provided field. Notifications will be sent to this email once data export is done with a link to download the data.
- If "Notify via Webhook" is selected, input the valid webhook URL into the provided field. This URL will be used to send notification data when a data export occurs.
9. Activate the Notification:
- Ensure the "Active" checkbox is selected to enable the notification system.
10. Save Your Settings:
- Once all details and configurations are entered, click "Save" to store the notification setup.
11. Utilizing "EXPORT_DATA" Notifications:
- When a data export is requested via API, the configured notification will be triggered after the data is successfully generated.
- If using email, a notification will be sent to the specified email address containing relevant information about the exported data.
- If using a webhook, the notification data will be sent to the provided webhook URL.
3.8.1. Webhook Export Data Notification
Sample Webhook for EXPORT_DATA Notification
            {
              success: true,
              type : "EXPORT_DATA"
              fileDownloadLink: "https://chirp.digital/api/getExportRequestDataApi/test_1203849125725.csv"
            }
3.9. XTRAHISTORY_STATUS
XTRAHISTORY_STATUS triggers a notification when a) the customer selects a financial institution that does not support Xtra History or b) The Chirp Xtra History™ feature is not enabled on the Chirp Entity. There is only one rule provided for this notification type which is TRIGGERED.
Steps for creating a XTRAHISTORY_STATUS notification
1. Login to the Portal:
- Use your credentials to log in to the Portal. Ensure that you have Entity Admin privileges or a manager role to access the necessary settings.
2. Access the Notifications Settings:
- Once logged in, you will be directed to the portal dashboard.
- Find the "Settings" option in the left-hand navigation menu and click on it to expand the menu.
3. Navigate to Notifications:
- From the expanded menu, locate and click on the "Notifications" option. This will take you to the notification’s settings page.
4. Add a New Notification:
- On the notification’s settings page, you will find an option to "Add Notification." Click on this option to proceed with creating a new notification.
5. Select Notification Type:
- In the "Type" dropdown, choose "XTRAHISTORY_STATUS". This notification is used when a new request is created with the option to request Chirp Xtra History™ and the selected bank does not support Xtra History or the Chirp Entity does not have the feature enabled.
6. Choose Recipients (Optional):
- Determine who should receive these notifications. If you want to notify all relevant parties, select "Apply for all profiles" checked.
7. Configure Notification Method:
- Select the "Notify via Webhook" option to trigger notifications via a webhook.
8. Provide Webhook URL:
- Provide a webhook URL for the notification status to be posted.
9. Activate the Notification:
- Ensure the "Active" checkbox is selected to enable the notification.
10. Save Your Settings:
- Once all details and configurations are entered, click "Save" to store the notification setup.
3.9.1. Webhook Xtra History Status Notification
Sample Webhook for XTRAHISTORY_STATUS Notification
  {
    requestCode: "QLU0GU",
    type: "XTRAHISTORY_STATUS",
    bankName : "Chirp Test Bank",
    description : "Xtra History is not enabled for this Chirp Entity. Please contact Chirp for more information." or "The financial institution does not support Xtra History so Xtra History was not requested."
  }
Note : If an entity does not configured for Xtra History the "bankName" in the payload is passed as "NA"
Field Definitions
| # | Field Name | Data Type | Description |
|---|---|---|---|
| 1 | requestCode | String | Request code for which the XTRAHISTORY_STATUS notification is triggered |
| 2 | type | String | Type of the notification triggered |
| 3 | bankName | String | Bank name where customers are selected during the verification process or request creation |
| 4 | description | String | Detailed description of the bank selection or entity Xtra History configuration |
3.10. TP_STATUS_UPDATE
TP_STATUS_UPDATE triggers a notification for integrated 3rd party configurations such as Lokyata, Bankuity, XactDate and others. There is only one rule provided for this notification type, which is COMPLETED.
Steps for creating a TP_STATUS_UPDATE notification
1. Login to the Portal:
- Use your credentials to log in to the Portal. Ensure that you have Entity Admin privileges or a manager role to access the necessary settings.
2. Access the Notifications Settings:
- Once logged in, you will be directed to the portal dashboard.
- Find the "Settings" option in the left-hand navigation menu and click on it to expand the menu.
3. Navigate to Notifications:
- From the expanded menu, locate and click on the "Notifications" option. This will take you to the notification’s settings page.
4. Add a New Notification:
- On the notification’s settings page, you will find an option to "Add Notification." Click on this option to proceed with creating a new notification.
5. Select Notification Type:
- In the "Type" dropdown, choose "TP_STATUS_UPDATE". This notification is used when a TP request is completed.
6. Select TP List:
- In the 'Select TP' multiselect dropdown, choose the TPs you want to get notified about when the process is completed.
7. Choose Recipients:
- Determine who should receive these notifications. If you want to notify all relevant parties, select "Apply for all profiles" checked.
8. Configure Notification Method:
- Select the "Notify via Webhook" option to trigger notifications via a webhook.
9. Provide Webhook URL:
- Provide a webhook URL for the notification status to be posted.
10. Activate the Notification:
- Ensure the "Active" checkbox is selected to enable the notification.
11. Save Your Settings:
- Once all details and configurations are entered, click "Save" to store the notification setup.
3.10.1. Webhook TP Status Notification
Sample Webhook for TP_STATUS_UPDATE Notification
  {
    requestCode: "QLU0GU",
    type: "TP_STATUS_UPDATE",
    provider: "Provider",
    status: "COMPLETED",
    entity: "65tg821wi21e12e",
    profile: "3278te8g32832d"
  }
Field Definitions
| # | Field Name | Data Type | Description |
|---|---|---|---|
| 1 | requestCode | String | Request code for which the TP_STATUS_UPDATE notification is triggered |
| 2 | type | String | Type of the notification triggered |
| 3 | provider | String | The third-party provider for which the notification is being triggered |
| 4 | status | String | Status of the TP Request |
| 5 | entity | String | Entity Id of the request code |
| 6 | profile | String | Profile Id of the request code |
3.11. TP_DATA_ANALYSIS
TP_DATA_ANALYSIS triggers a notification for integrated 3rd party configurations such as Lokyata, Bankuity, XactDate and others. There is only one rule provided for this notification type, which is COMPLETED.
Steps for creating a TP_DATA_ANALYSIS notification
1. Login to the Portal:
- Use your credentials to log in to the Portal. Ensure that you have Entity Admin privileges or a manager role to access the necessary settings.
2. Access the Notifications Settings:
- Once logged in, you will be directed to the portal dashboard.
- Find the "Settings" option in the left-hand navigation menu and click on it to expand the menu.
3. Navigate to Notifications:
- From the expanded menu, locate and click on the "Notifications" option. This will take you to the notification’s settings page.
4. Add a New Notification:
- On the notification’s settings page, you will find an option to "Add Notification." Click on this option to proceed with creating a new notification.
5. Select Notification Type:
- In the "Type" dropdown, choose "TP_DATA_ANALYSIS". This notification is used when a TP request is completed.
6. Choose Recipients:
- Determine who should receive these notifications. If you want to notify all relevant parties, select "Apply for all profiles" checked.
7. Configure Notification Method:
- Select the "Notify via Webhook" option to trigger notifications via a webhook.
8. Provide Webhook URL:
- Provide a webhook URL for each TP notification status to be posted.
9. Activate the Notification:
- Ensure the "Active" checkbox is selected to enable the notification.
10. Save Your Settings:
- Once all details and configurations are entered, click "Save" to store the notification setup.
3.11.1. Webhook TP Request Data Notification
Sample Webhook for TP_DATA_ANALYSIS Notification
 {
  "requestCode": "QLU0GU",
  "type": "TP_DATA_ANALYSIS",
  "tpResponse": "{\"testData\":\"test\"}",
  "provider": "Provider",
  "status": "COMPLETED",
  "entity": "65tg821wi21e12e",
  "profile": "3278te8g32832d",
  "customerId" : "CUS_1234",
  "productId" : "PRO_123",
  "createdBy" : "Test LMS"
}
Field Definitions
| # | Field Name | Data Type | Description |
|---|---|---|---|
| 1 | requestCode | String | Request code for which the TP_DATA_ANALYSIS notification is triggered |
| 2 | type | String | Type of the notification triggered |
| 3 | tpResponse | String | Response from the TP |
| 4 | provider | String | The third-party provider for which the notification is being triggered |
| 5 | status | String | Status of the TP Request |
| 6 | entity | String | Entity Id of the request code |
| 7 | profile | String | Profile Id of the request code |
| 8 | customerId | String | The customer id can represent the Unique ID of a customer record used in the system that integrates with Chirp that retains a reference back to Chirp’s requestCode. For example, this can be a customer id or any other unique identifier in the system of record for connecting the Chirp request code with that customer. |
| 9 | productId | String | The productId can represent a Unique ID in the system integrated with Chirp that retains a reference back to Chirp’s requestCode. For example, this can be a loan id, application id or any other unique identifier in the system of record for connecting the Chirp requestCode with that product. |
| 10 | createdBy | String | The name of the LMS in which the customer request is created. If the request is created through the portal, it will be returned as ‘Chirp Portal’. |
4. Notification Rules
Each Notification type has rules that can be configured to determine when Chirp Notifications should be triggered and on which Notification Channel the notification should be sent.
Below are the rules available for each notification type
| # | Rule | Description | Available for Notification Type |
|---|---|---|---|
| 1 | GREATER_THAN | Greater than the configured amount | DEPOSIT, BALANCE |
| 2 | GREATER_THAN_OR_EQUAL_TO | Greater than or equal to the configured amount | DEPOSIT, BALANCE |
| 3 | LESSER_THAN | Lesser than the configured amount | DEPOSIT, BALANCE |
| 4 | LESSER_THAN_OR_EQUAL_TO | Lesser than or equal to the configured amount | DEPOSIT, BALANCE |
| 5 | EQUALS_TO | Equal to the configured amount | DEPOSIT, BALANCE |
| 6 | REMOVED | Customers’ connection with the financial institution is removed. And as a result, any account related data for the customer can no longer be updated. | ACC_CONNECTION_STATUS |
| 7 | UPDATED | Request code is updated while verification and bank refreshes | REQUEST_STATUS, REFRESH_STATUS |
| 8 | MATCHES | Matches the original description of a transaction | KEYWORD |
| 9 | TRIGGERED | Triggered when a customer selects a financial institution that’s not supported or the feature is not enabled | UNSUPPORTED_BANK, XTRAHISTORY_STATUS |
| 10 | GENERATED | Triggers notification upon data export request creation | EXPORT_DATA |
| 11 | COMPLETED | Triggers notification when the TP Request is completed | TP_STATUS_UPDATE, TP_DATA_ANALYSIS |
5. Notification Logs
For reference and review eMail and Webhook notification logs are saved and provided for Chirp Entities to view in the Chirp Portal. These logs can be found in the main navigation sidebar as depicted in figure 3.4 shown below
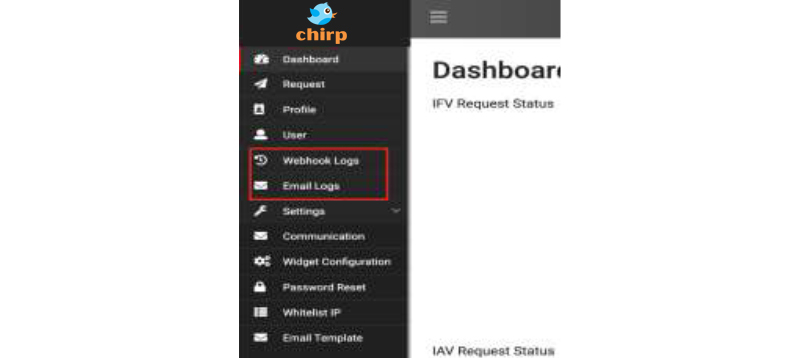
Figure 5.1
6. Configure Notifications
6.1. Entity Level Configuration
6.1.1. Add Notification configuration
The Entity level configuration can be added under the Notification tab in the Notification Management page. The “Add Notification” button takes to a page where the notification details can be configured and saved as shown in the figure 3.5
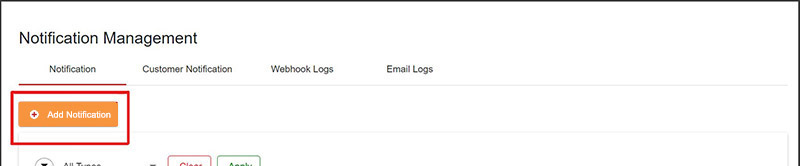
Figure 6.1
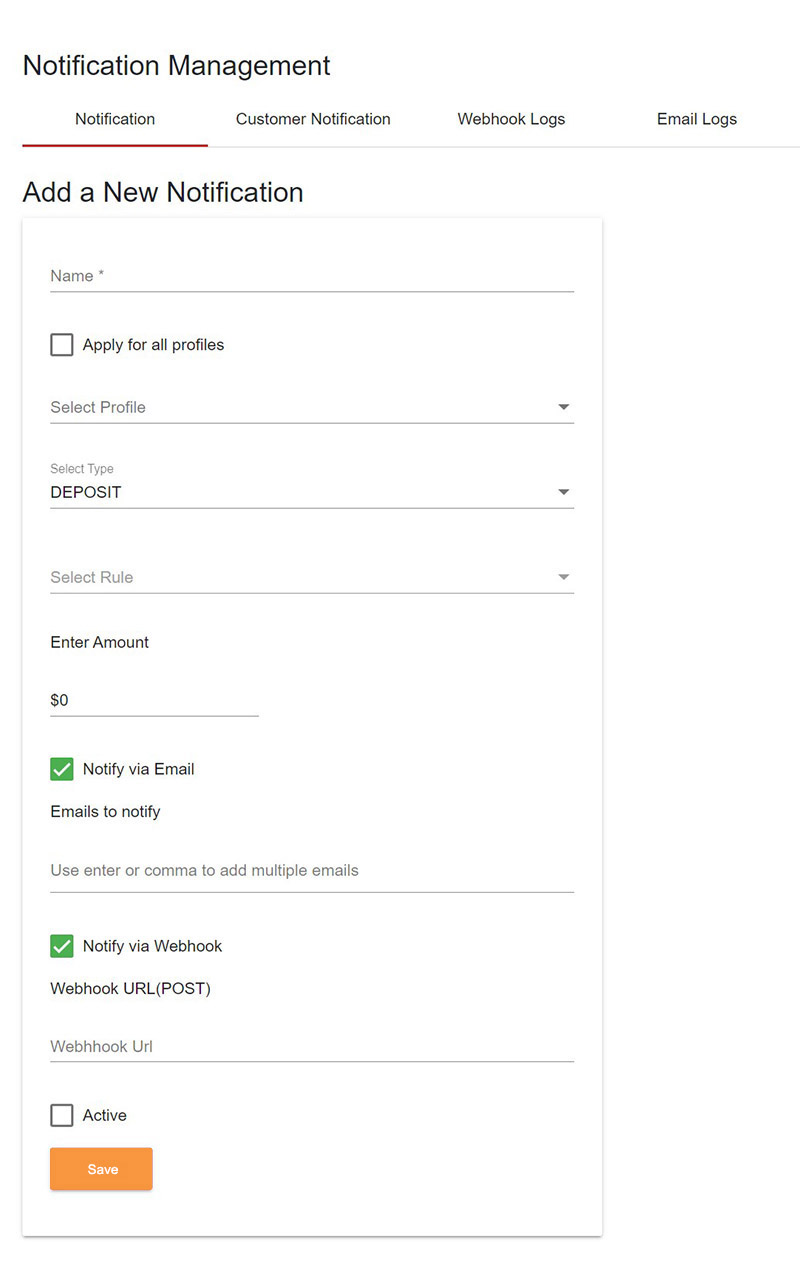
Figure 6.2
Perform the below steps to create notification configuration:
- Name - The name field requires a reference name for the notification configuration. This could be anything but unique.
- Apply for all profiles - Checking this option enables the notification configuration for all profiles. (BALANCE, DEPOSIT, ACC_CONNECTION_STATUS)
- Select Profile - If the notification to configure has the Apply for all profiles unchecked then a profile needs to be selected from this dropdown for the notifications to trigger (BALANCE, DEPOSIT, ACC_CONNECTION_STATUS)
- Select Type - A notification type needs to be selected. Please refer the section Notification Types for more info
- Select Rule - A rule needs to be selected. Please refer the section Notification Rules for more info
- Enter Amount - A dollar amount needs to be set based on the rule selected in the previous step
- Notify via email, Notify via webhook - The channels to notify customer updates. Please refer the section Notification Channels for more info
- User Level - This needs to be checked if a notification is required to be configured on a user level. A notification would be sent on all the requests the configured user is creating based on the saved configuration
- Profile Level - This needs to be checked if a notification is required to be configured on a profile level. A notification would be sent on all the requests associated with the configured profile based on the saved configuration
- If REQUEST_STATUS or REFRESH_STATUS is selected with no user and profile level is set then the notification is configured on an entity level
6.1.2. Modify Entity Notification Configuration
A configured notification can be modified by clicking on the edit icon under the actions menu in the Notification tab
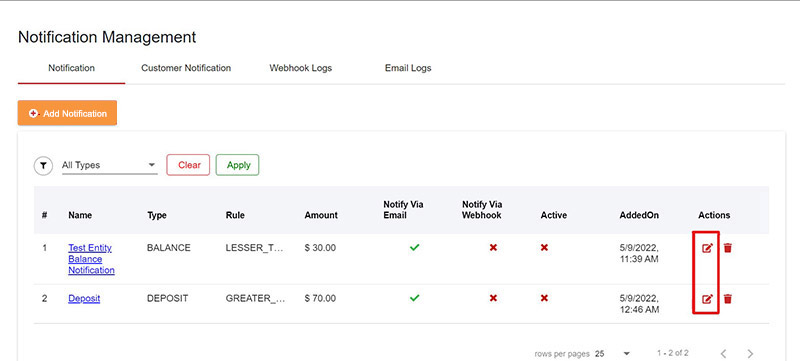
Figure 6.3
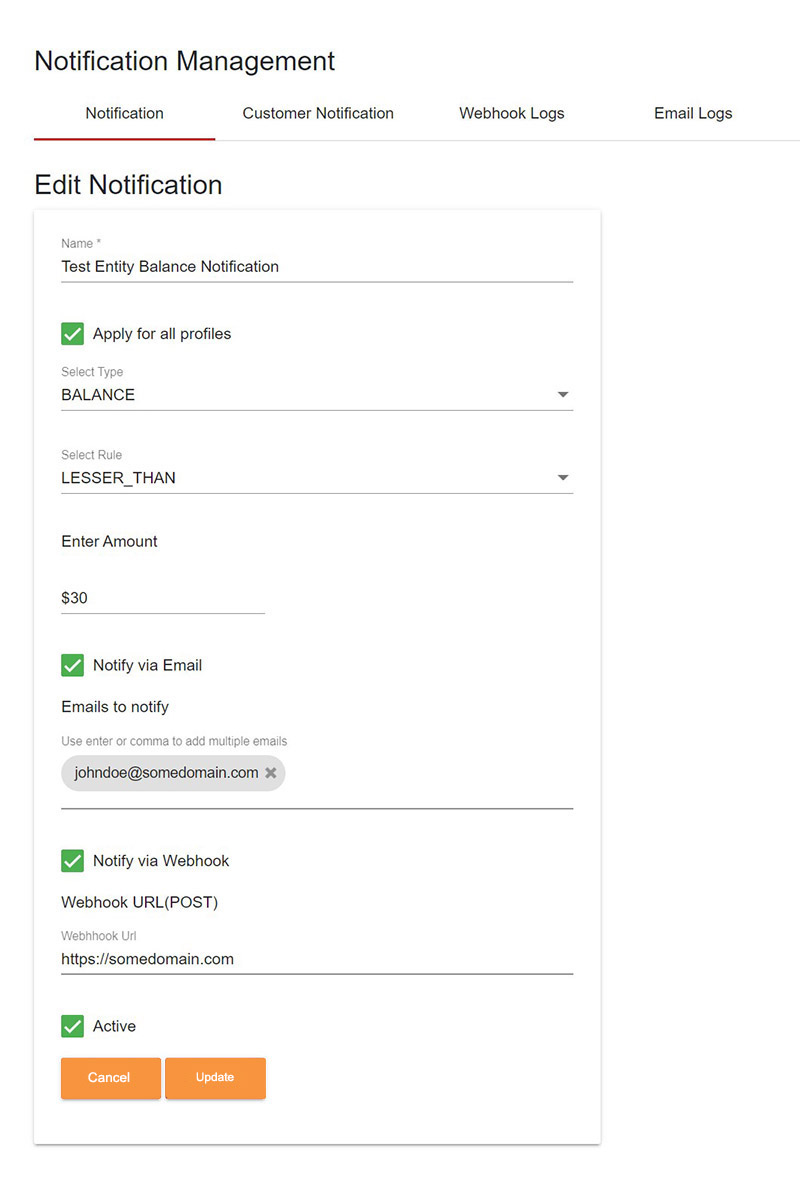
Figure 6.4
6.1.3. Delete Notification configuration
A notification configuration added can be removed if not used by simply clicking the trash icon under the actions menu in the Notification tab
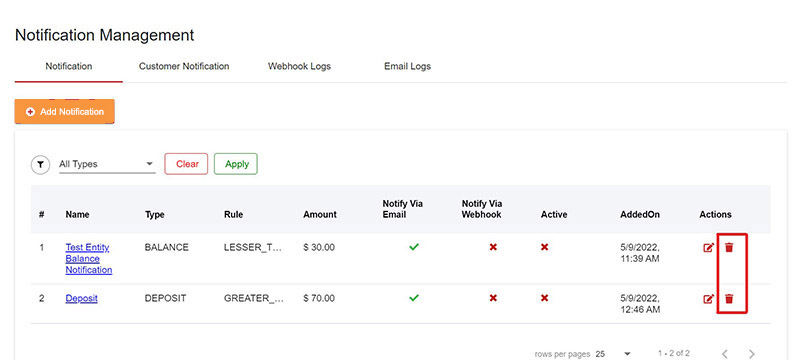
Figure 6.5
6.2. Customer Level Notification
6.2.1. Add Customer Notification configuration
The Customer level configuration can be added either via the Create Notification option under the Actions menu for each request in the Request Management page(Request > Actions > Create Notification) as shown in the figure 2.1 or through the Add Customer Notification option under the Customer Notification tab in the Notification Management page(Settings > Notifications > Customer Notification > Add Customer Notification) as shown in the figure 2.2.
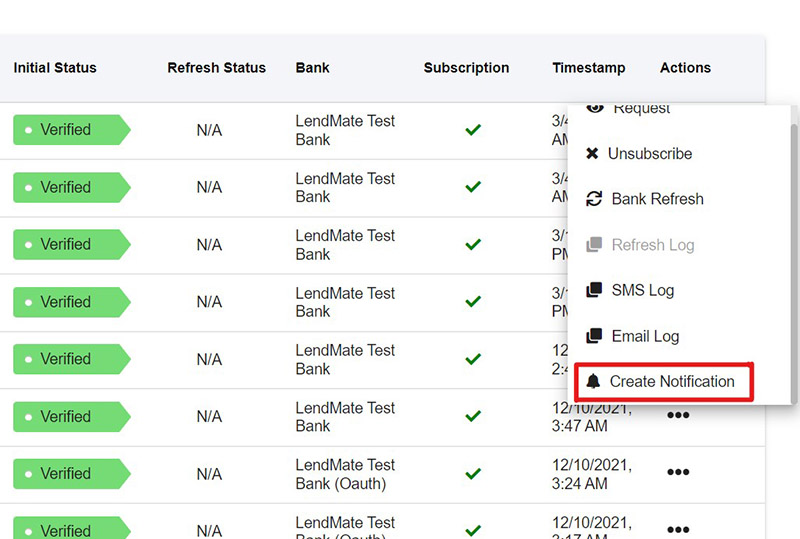
Figure 6.6

Figure 6.7
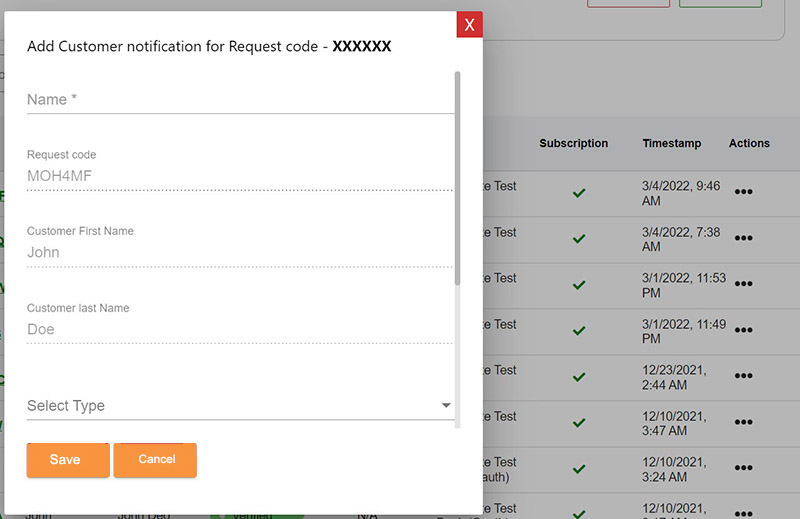
Figure 6.8
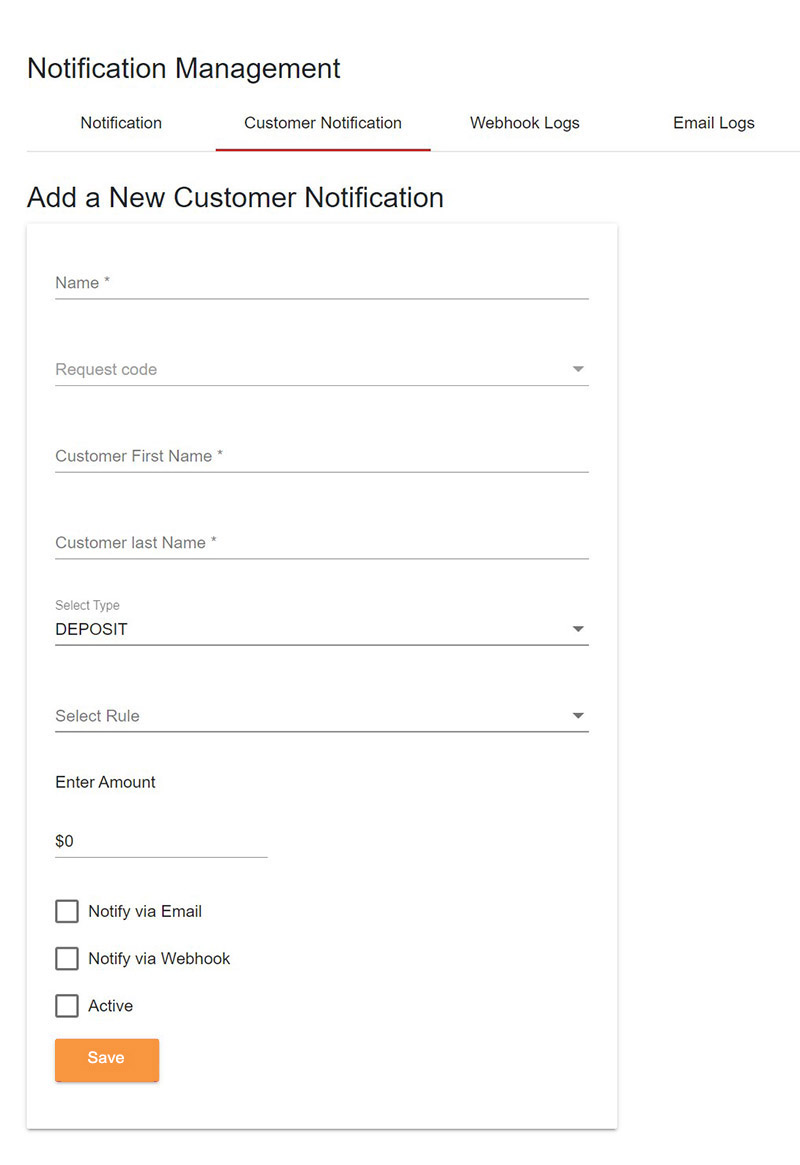
Figure 6.9
Perform the below steps to create customer notification configuration:
- Name - The name field requires a reference name for the notification configuration. This could be anything but unique.
- Request code - A Request code needs to be selected in the dropdown
- Customer First Name - The Customer First Name will prefill when request code is selected
- Customer Last Name - The Customer Last Name will prefill when request code is selected
- Select Type - A notification type needs to be selected. Please refer the section Notification Types for more info
- Select Rule - A rule needs to be selected. Please refer the section Notification Rules for more info
- Enter Amount - A dollar amount needs to be set based on the rule selected in the previous step
- Notify via email, Notify via webhook - The channels to notify customer updates. Please refer the section Notification Channels for more info
6.2.2. Modify Customer Notification Configuration
A configured notification can be modified by clicking on the edit icon under the actions menu in the Notification tab
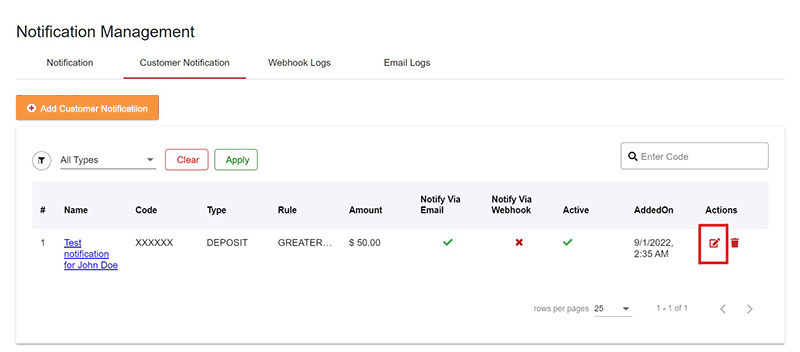
Figure 6.10
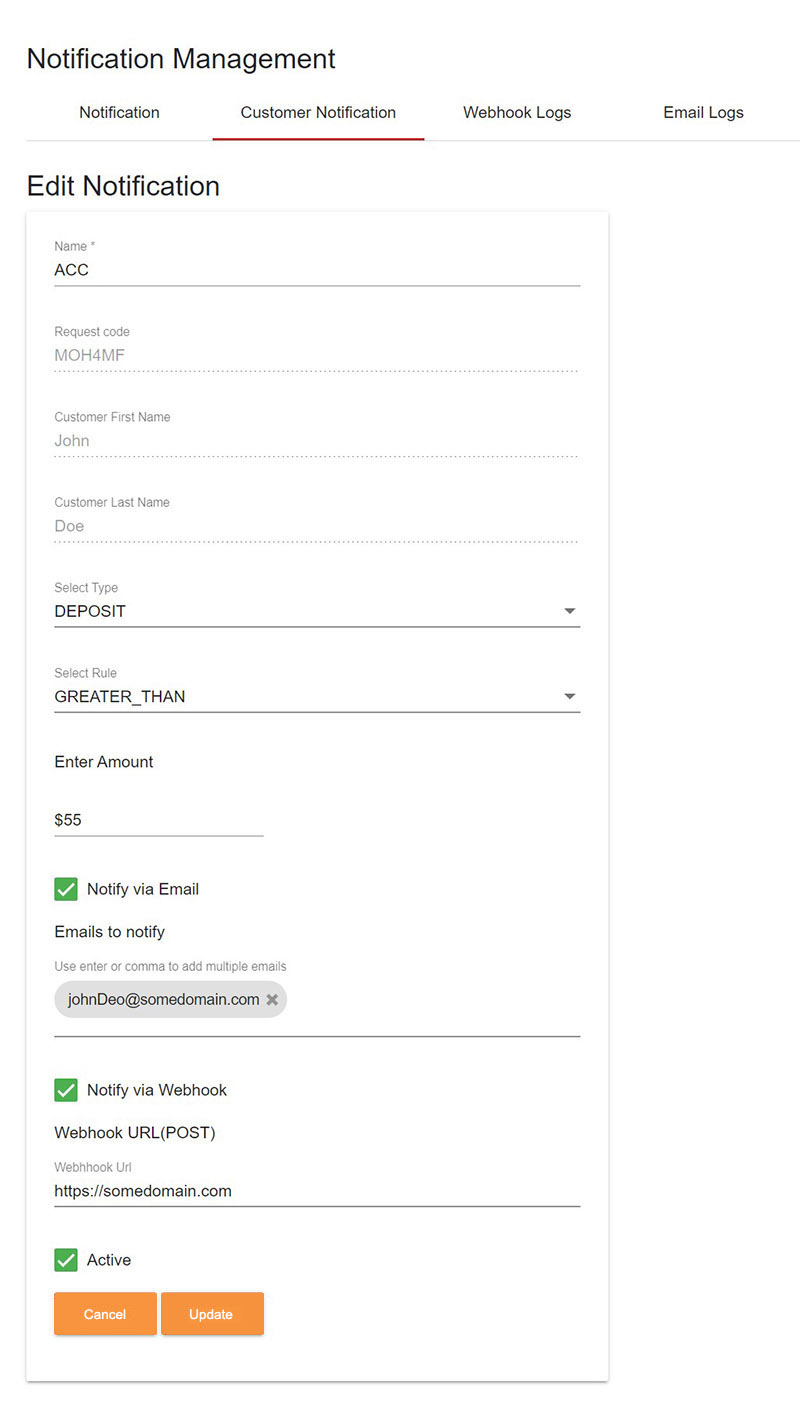
Figure 6.11
6.2.3. Delete Customer Notification configuration
A notification configuration added for a customer can be removed if not used by simply clicking the trash icon under the actions menu in the Notification tab. Also, if a verified customer connection is disconnected, then the system automatically removes the configuration added for the customer.
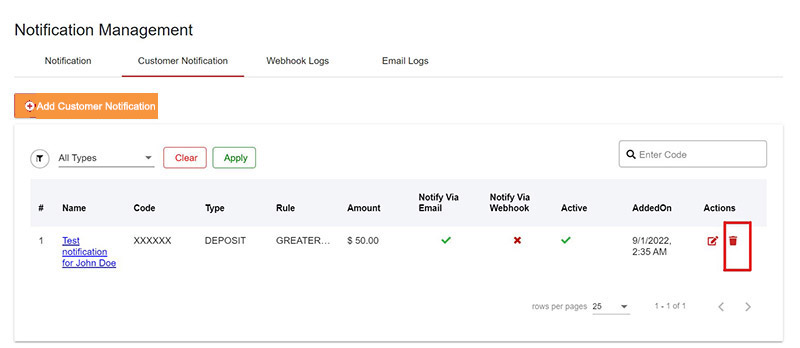
Figure 6.12
6.3. Add Defaults
6.3.1. Adding Defaults in Email & Webhook Settings
1. Dropdown Menu: On the Notification Management page either in Entity Notification and Customer Notification, locate the dropdown menu situated near the Add Notification button. From the dropdown menu, select the appropriate Type you wish to create a default email and webhook for.
2. Type Selection: Upon selecting a specific Type, a new button named Add Default Email & Webhook will be dynamically added near the dropdown. Click on the button to trigger a popup window.
3. Setting Default Information: : In the popup, you'll find fields to set the default Email and Webhook information.
4. Save Default Settings: : After filling in the email and webhook details, save your changes. These settings will be automatically populated when creating notifications of the selected type.
6.3.2. Editing Defaults in Email & Webhook Settings
1. Default Settings Display: In the Notification Management page, you'll notice the pre-filled default Email and Webhook settings based on the type you selected. Click the "Edit" icon next to the prefilled default settings for Email and Webhook.
2. Customization: Edit these default Email & Webhook Setting to match the requirements.
3. Update: Click the Update button. Your customized Email & Webhook Setting Details will be updated within the system.
7. Contact Information and Support
For questions, feedback or support implementing Chirp please contact your account manager or contact us at [email protected] or webform .