
1. Introduction
Welcome to the Chirp IFV Portal Guide!
In this document, you will find all the resources you need to learn about, quickly integrate with, and get started using Chirp.
Chirp solutions provide you with features and data you need to build Instant Financial and Auto Verification processes and associated workflows for your unique underwriting process.
1.1. About Chirp
Chirp is the Best Choice & All-in-one solution for Instant Financial and Auto Verification. With real data, Chirp gives you the insight to accurately and efficiently make your lending decisions for improved profitability.
Current Product Offerings:
- IFV – Instant Financial Verification
With access to over 48,000 financial institutions, your business will be able to verify your customers account details efficiently & with ease, for one month with no refresh charge.
Touchless; digital verification of your customer's vehicle right from their mobile device. This gives you access to real-time videos and images of their vehicle’s exterior, interior, mileage, license plate and dash panel.
Lenders will be able to create and manage Instant Financial and Auto Verification right from their Chirp portal account or from their Loan Management System through Chirp’s API.
2. Chirp IFV User Interfaces
The following sub-sections will describe each of the User Interfaces a Chirp Admin User will able to navigate to perform tasks in Chirp Portal
2.1. Dashboard

Figure 10: Chirp Dashboard
The status of various requests created by the entity for the current day will be represented as a Pie Chart and in a table as in the above figure. Users will be able to select the time range to see the statistics as needed.
On the left side, the following set of menu options to navigate to various pages of the portal will be present. Clicking on these menu options will navigate the user to the respective pages.
- Dashboard – Main Dashboard
- Requests – This page will list all the requests created by the entity
- Profile – This page lists all the profiles present under an entity
- User – This page lists all the users created under an entity
- Invoice – This page lists all the invoices raised by Chirp to that entity
-
Settings – This will collapse the following sub-menu options
available for settings
- Password Reset Allows users to reset their login password
- API Settings Page to get access to Chirp API Keys – Available On-request
- Whitelist IP Allows Entity Admin to whitelist specific IP Address to get access to the portal and API
- Email Template Allows entity admin to configure customer e-mail – Available On-request
2.2. Requests Page
When you setup an account with Chirp, you will be setup either for Pay-as-you-go (PAYG) Plan or Subscription Plan. Depending on the plan you are in, the Request Page will be shown. This page will list all the requests created within an entity. All the requests will be listed in a grid view with columns for count (#), Profile from which the request was created, Request Code, User who created the request, current status of the request, Bank, Timestamp of when the request was created and Actions button to invoke option to perform various actions on the request.
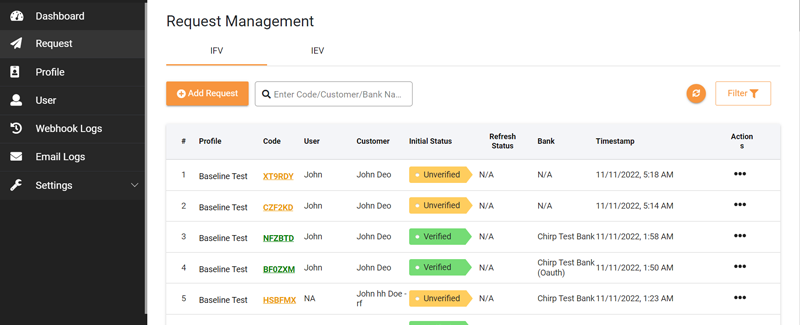
Figure 11 (a): Request Listing Page – PAYG Plan
The above screenshot is the depiction of Request Listing Page when you are in Pay-as-you-go Plan. The next screenshot depicts the Request Listing Page when you are in Subscription Plan.
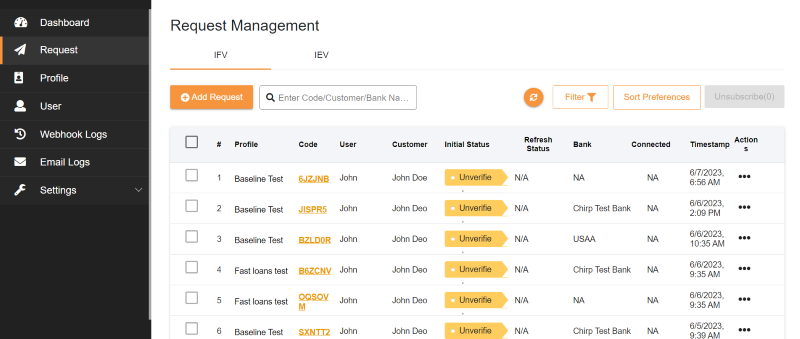
Figure 11 (b): Request Listing Page – Subscription Plan
The top of the Request Listing page will have the following three options.
Add Request – Clicking this option will pop-up an interface to create and send an IFV request.
Search Requests – The is an instant search option to search for requests by entering Request Code or Customer Name.
Filter – Clicking this option will expand and show a set of drop-down boxes using which, the user can filter the requests by Product, by Access Type, by Request Status, by Profile, by User who created the request, Subscription Status of request and by timeline. By clicking the Filter button, the Filter panel can be expanded or collapsed.
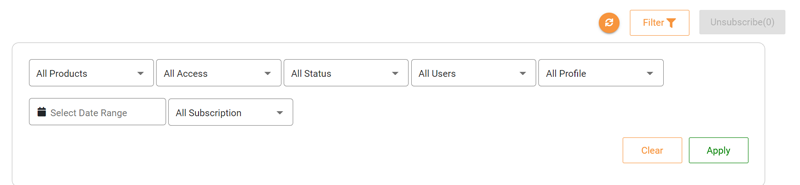
Figure 12: Requests Filter option
All the requests will be listed in a grid view as depicted in the above figure. Request Code will be color coded based on the status of the request.
2.2.1. Requests – Actions
In the request listing page, the last column of the grid has a button with three dots. Actions menu can be invoked by clicking on this “. . .” button as highlighted in the below interface.
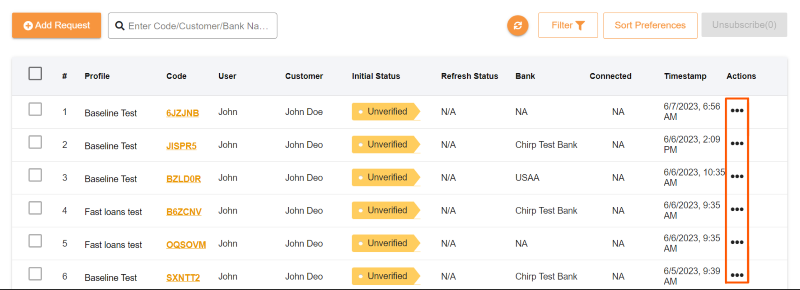
Figure 13: Requests Actions
Below is the menu that pops-up when the Action button is clicked.
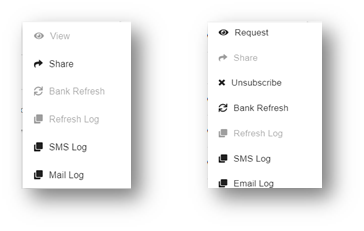
Figure 14: Requests Actions Menu for Pay-as-you-go plan & Subscription Plan
The menu has options to View information about the request, share the request link to customers e-mail or cell phone, perform a Bank Refresh to aggregate the latest financial information, check the log of all the refresh action performed on this request, view the log of all text messages sent for this request and view the log of e-mails sent to the customer. If you in Subscription Plan, there will be an option to unsubscribe a customer from monthly subscription.
Actions View
The following interface with complete information about the request will be displayed when View option is clicked on the Actions Menu
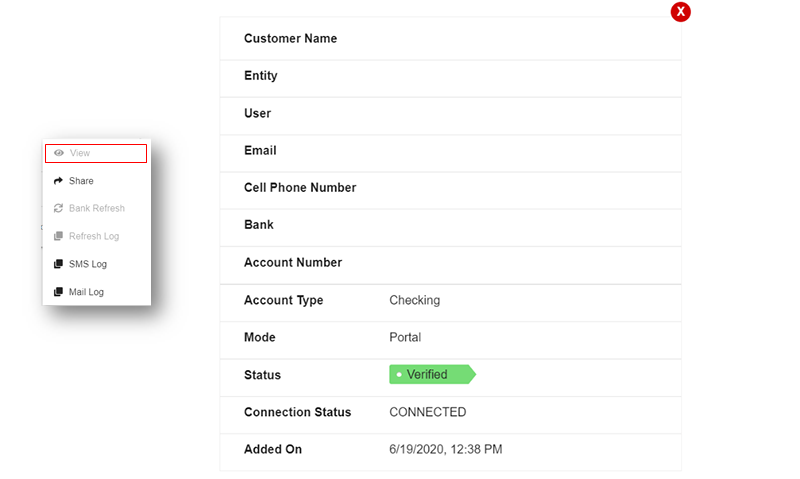
Figure 15: Requests Actions Menu View
Actions Share
The following interface will be invoked on clicking on Share option in the Actions menu. This interface will have options to enter the customer’s e-mail and cell phone number to send the request e-mail and text message as needed. There is also an option to copy the Request URL to allow users to send the request through the communication means of their choice.
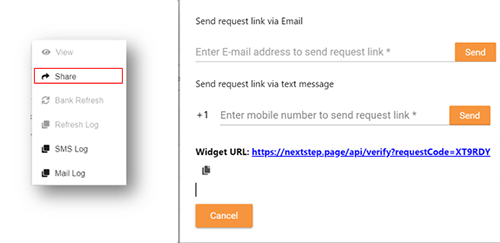
Figure 16: Requests Actions Menu Share
Share option will be available only for requests that are currently in Unverified and Attempted Status.
Actions Bank Refresh
Bank Refresh option allows users to request and aggregate the latest financial information associated with the request. Once Bank Refresh is clicked, the request will be processed, and a response will be displayed as depicted in the below screen.
Bank Refresh option will be enabled for requests with status as Verified. Requests with other status will have the Bank Refresh option disabled.
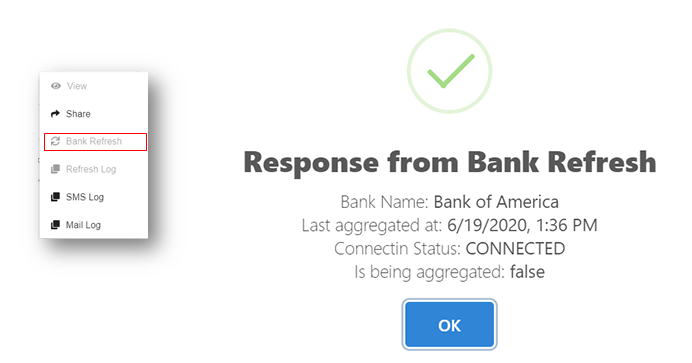
Figure 17: Requests Actions Menu Bank Refresh
In scenarios where the customer has changed their Bank login credentials or if they have closed their Bank Account or the Bank itself stops supporting data aggregation, the refresh will result in failure and future Bank Refresh will be disabled. However, the request will have the financial information from the previous successful request available.
Please note that, once Bank Refresh is performed, the option will not be available for 3 hours to perform the next Bank Refresh
Actions Refresh Log
Refresh Log window will list the history of refreshes initiated and completed for a request with status and timestamp. It will also display reason for reject/denial if the Bank Refresh Fails. Click on the Refresh log option in Action menu and the following interface will display the list of refreshes happened for the selected request.
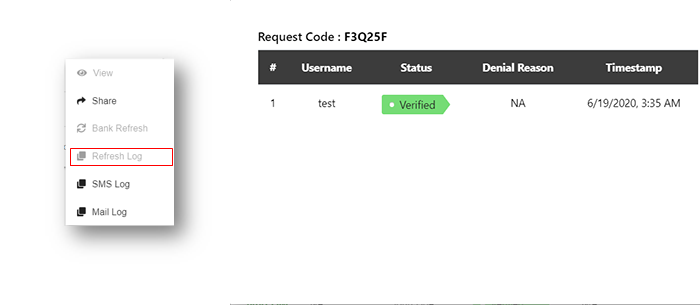
Figure 18: Requests Actions Menu Refresh Log
Actions SMS Log
SMS Log window will list the history of text messages sent to the customer associated with this request. It will display the recipient’s cell phone number, text Body, timestamp and delivery Status. Click on the SMS log option in Action menu to invoke this interface.
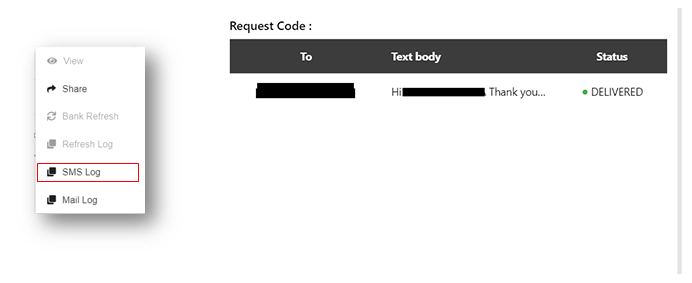
Figure 19: Requests Actions Menu SMS Log
Actions Email Log
Email Log window will list history of emails sent to the customer. It will display the recipient’s email, email Body, timestamp, and delivery Status. Click on the Email log option in Action menu to invoke the Email Log Interface.
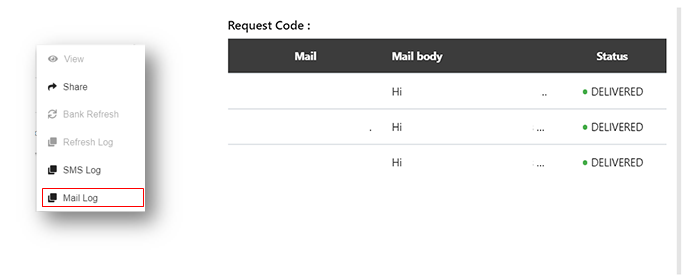
Figure 20: Requests Actions Menu Email Log
2.2.2. Add or create Requests
IFV requests can be created from Requests Page. Click on the Add Request button seen at the top of the interface.
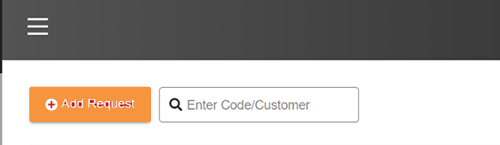
Figure 21: Add Request Button
A new interface as depicted below will appear.
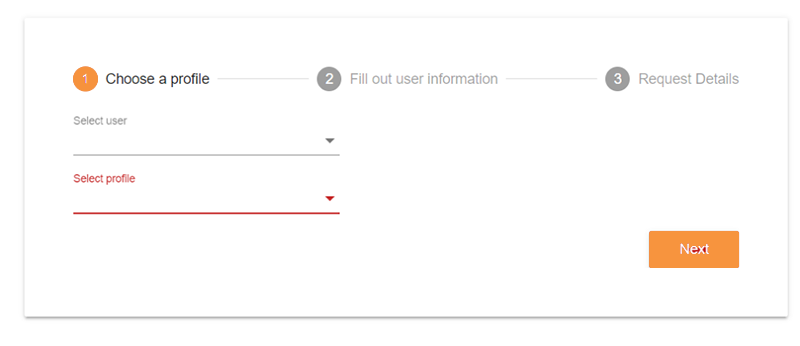
Figure 22: Add Request – Step 1
Perform the following steps in the
- Select the User in your store on whose behalf this request is being created
- Select the Profile (Store) on behalf of which this request is being created
- Click “Next” button
You will be navigated to the Customer Information page

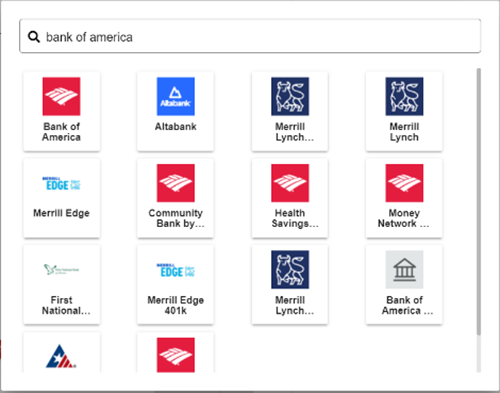
Figure 23: Add Request – Step 2
In this interface, fill out the customer information whose Financial Verification is requested
- Enter First Name, Last Name, Email, Cell Phone number, Bank Account number and Bank Account Type of the customer.
- In the Search Bank field, enter the Bank Name and click on the “Search” button. An interface will bring-up the available banks.
Select the customer’s bank and click on “Create Request” button.
Chirp will create an IFV request and you will be taken to an interface displaying the request details. This Interface will display the Request Code and Links that you can copy to send to your customer by email. Simply click on the green copy button to copy the link to your clipboard.
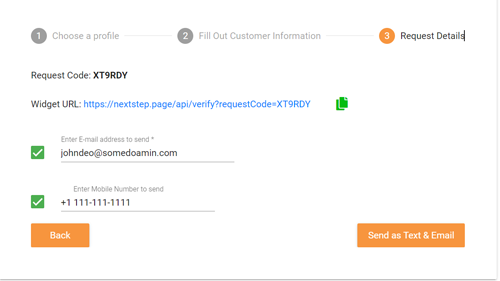
Figure 24: Add Request – Step 3
Once a request is created, the borrower or the direct customer of an Entity can be notified with request details for verification via Email or Text. The user can either choose to send as email or text or both by checking options of their choice and clicking the Send as Text or Send as Email or Send as Text & Email button which will be presented based on users delivery selection.
Request Code Status
Now that the request is created and sent to the customers. Based on if the customer successfully verifies a request or not, the status of a request will change. All the requests will be listed in the Requests Page. You can click on the Request Code on the grid view or View option in the Action menu to see the details of a specific requests. The color of the Request Code link will indicate the status of the request.
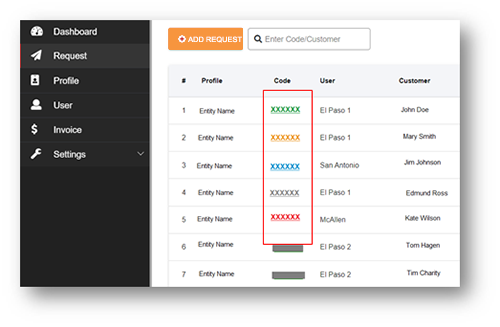
Figure 25: Request Code Status
Here is the description of different Request Code color indicators.
Green – This is a verified request and on clicking which, you can see the financial data associated with this customer.
Orange – This is an unverified request. By clicking this, you can see the original request details.
Blue – This is an attempted request. The customer has attempted verifying this request. It stays attempted until an end state such as verified or rejected is reached.
Red – This is a rejected request. The customer has reached the maximum allowed attempts to verify this request and failed because of credential error or bank error.
Grey – This is an expired request. A request will be expired if it stays unverified for a period of 30 days.
2.2.3. Upload CSV to unsubscribe
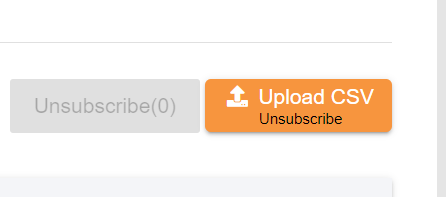
Figure 26: Upload CSV unsubscribe button
Requests can be unsubscribed in bulk either by selecting them individually or uploading a CSV file with all the request codes in it as given in the sample below. Once marked/uploaded, the selection is shown as a preview before proceeding to unsubscribing them all. A report is generated post the unsubscribe action for the Upload CSV option and their statuses are detailed below
[upload_sample.csv] [report_sample.csv]
Limitations
The maximum allowed unsubscribe limit per CSV upload is 500. Any additional entries in the document will be restricted and will not be part of the unsubscribe process or included in the report status.
Report statuses
- Request code - The unique request code of a request
- Status - The status of the unsubscribe action for the request
- Unsubscribed - Unsubscribed successfully
- Already Unsubscribed - The request has already been unsubscribed
- Permission Denied - The request is not eligible for the unsubscribe action. This is most likely to happen if a request is in Unverified, Attempted or Expired status
2.2.4. View Response for verified requests
The Request Code will be in Green if the request is verified. On clicking on the request code of a verified request, you will be taken to an interface with the response with the complete financial information of the selected request. The response will be organized as four sections – Account Information, Transaction Category, Transactions and Analytics. You can click on the arrow button present in the right side of this page to invoke the menu to navigate across these four sections of the response.
The first part of the response will have the Account Details. It includes a Summary, the original request information and the account information returned from bank. If the customer has multiple accounts, all the accounts will be listed as a dropdown within Account Type field as highlighted in the below interface. You can select each of the account to view the transactions of the selected account.
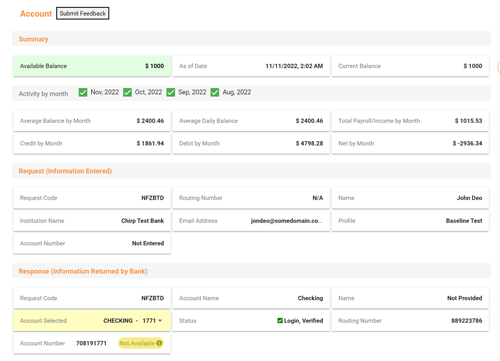
Figure 27: Response Account Summary
The second part of the response will provide a summary of transactions based on different categories like Income, Bills & Utilities, Financial, Shopping, Entertainment etc. You can click on a specific category to see the detailed transactions within the selected category.

Figure 28: Response Transaction Categories
Below interface illustrates how the transactions are displayed when Income Category is clicked.
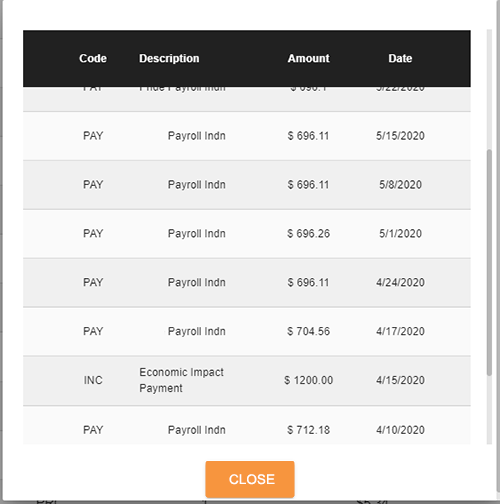
Figure 29: Response Transactions within a Category
The third part of the response will provide a detailed view of credit and debit transactions for the available period. You can scroll up and down to view the list of transactions within this section.
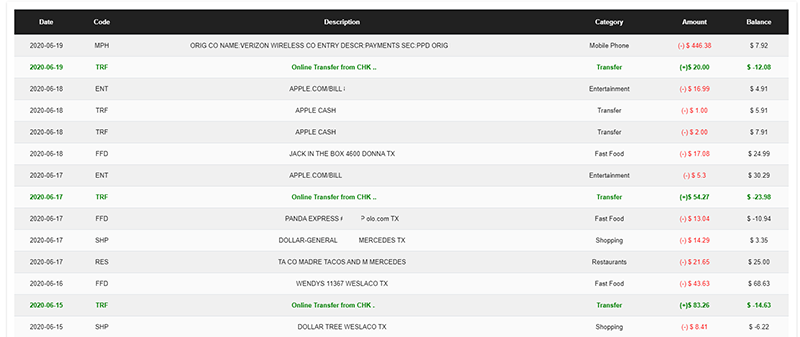
Figure 30: Response Detailed List of Transactions
The fourth part of the response will have a set of charts offering you a graphical representation of data. Below are the charts available as part of Chirp Response Analytics
- Trend of Credit and Debit transactions for the last 90 days.
- Payroll trend for the last 90 days.
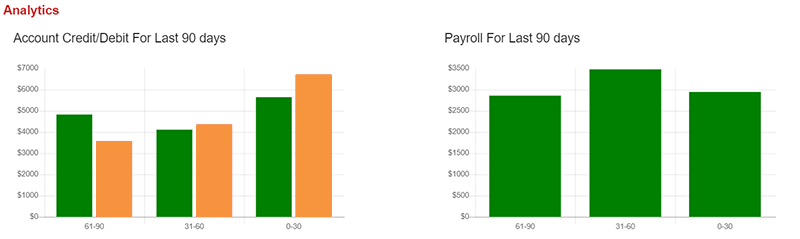
Figure 31: Response Analytics 1
3. Account Balance for the last 90 days*
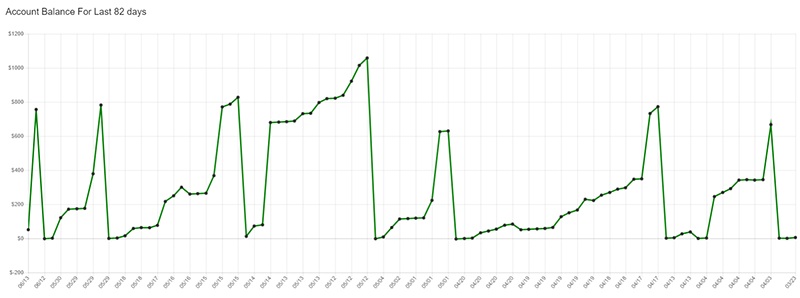
Figure 32: Response Analytics 2
4. Expenses break-up based on categories
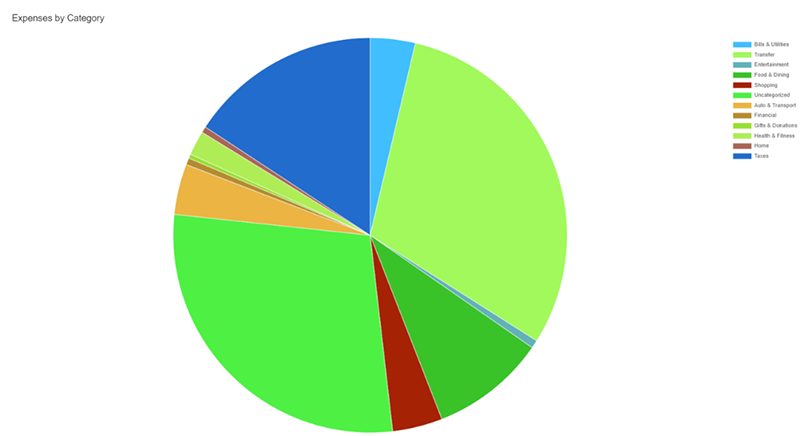
Figure 33: Response Analytics 3
*The period of trend is based on the number of days for which the data is available.
2.2.5. Debit Card Enrichment
The Enrichment of a debit card being connected to an account can be added for a request. This option is enabled by the Chirp team for entities as requested. The last 4 digits of the customers debit card needs to be added as given below in the results page by clicking the View/Edit button.

Figure 34: Debit Card Enrichment
In the request list page, the Actions menu contains an option as “Add Debit Card Number” which can also be used to add the last 4 digits of customers debit card

Figure 35: Add Debit Card Number
Along with the enrichment of a debit card being connected, all the transactions associated with the cards can also be seen as given in the image below.
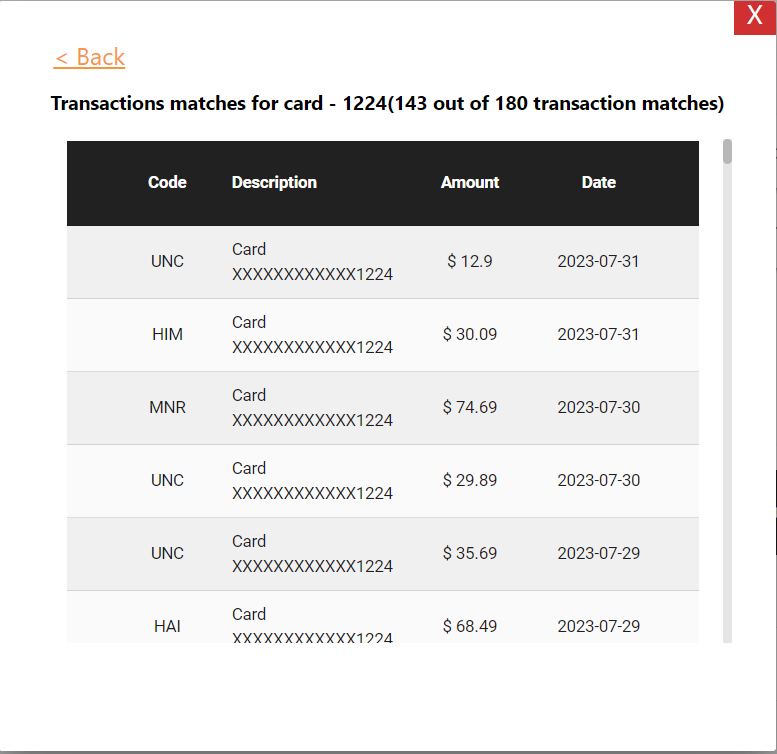
Figure 36: Transactions Matches for Card
2.3. Profile Page
Profile page will display all the profiles you have created for your entity. Your entity might be operating under a banner or brand and you might have multiple stores. Each store can be categorized as a profile for your operating efficiency.

Figure 37: Profile Page
All the existing profiles will be listed in a grid view. You can click on the specific profile to see all the information about a profile. When a profile name is clicked an interface with the profile details will be displayed as depicted in Figure: 38
Most of the options in this interface relates to using Chirp API. You can refer Chirp API Guide for more information.
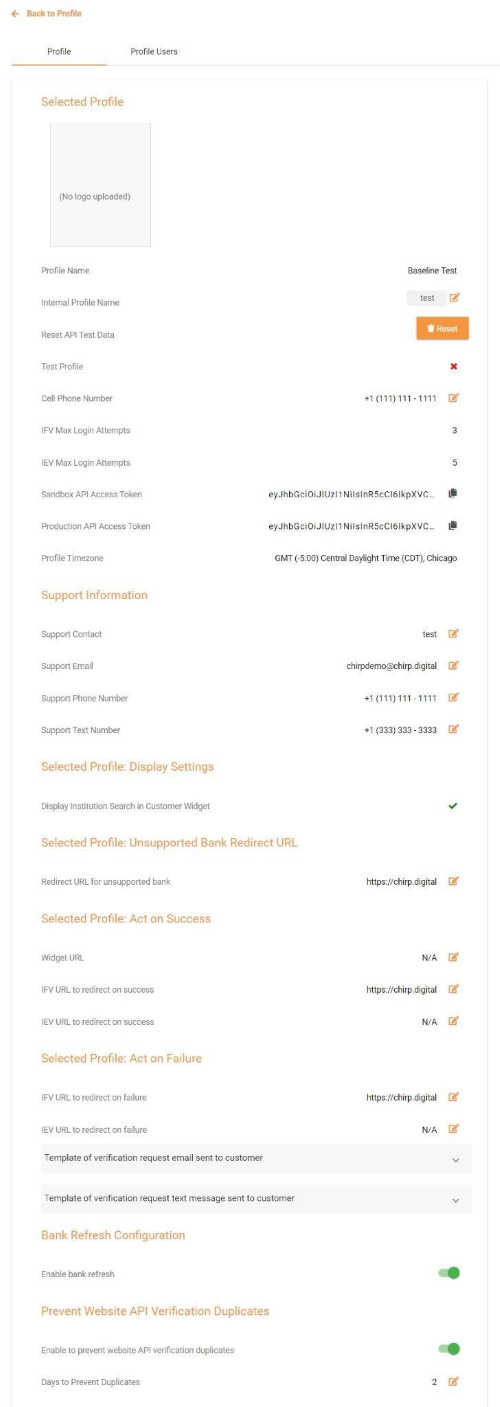
Figure 38: Profile Information
To add a Profile, you can click on the “Request to add a new profile” button seen at the top of the Profile Listing Page.
This will bring-up the form as depicted in the next figure. You can fill out the required information and send a request. Chirp team will review your request and approve the profile for you.
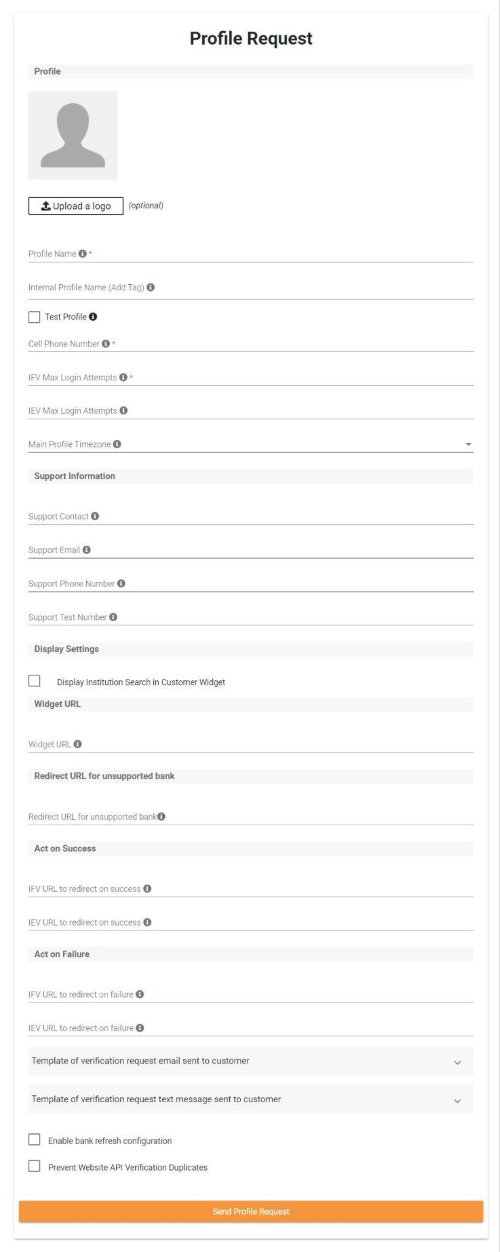
Figure 39: Profile Request Page
Below are the descriptions for each of the field to be filled in the Profile Request Form.
Profile Name: Name of the requested profile or Store
Internal Profile Name: Tag name of the requested profile for the reference
Test Profile: Check this box if you want to create a profile for testing purpose only
Cell Phone Number: Cell Phone number to be associated with your profile
Max Login Attempts: Number of login attempts allowed before prompting a customer that their login has failed. 3 Max Login Attempts are recommended.
Profile Timezone: Timezone to be associated with you profile
Support Information: These are optional fields to store more information about this requested profile.
- Support Contact - Support contact name to be associated with your profile
- Support Email - Support email to be associated with your profile
- Support Phone Number - support phone number to be associated with your profile
- Support Text Number - Support text number to be associated with your profile
Display Institution Search: If you want the customer to be able to search their Bank Name before they login, have this checkbox selected. If you want to directly present the Bank Login page based on the Bank Name selected in the requested, have this checkbox unselected.
Widget URL: When you create a request, the Request Code can be appended to your entity or profile’s website URL.
Redirection URL for unsupported bank: If the customer selects No on the unsupported bank pop-up they will be redirected to this URL.
Success URL: This is the URL to which your customer will be redirected once the request is successfully verified. This could be a Thank you page or the next step in your loan application process.
Failure URL: This is the URL to which your customer will be redirected after the maximum number of failed login attempts.
Verification Request E-mail Template: This is the pre-defined template of the e-mail that will be sent to the customers if a request is created and sent from Chirp Portal
Verification Request Text Message Template: This is the pre-defined template of the text message that will be sent to the customers cell phone number if a request is created and sent from Chirp
Enable bank refresh configuration: Check this box if you want to allow the bank refresh button to be displayed in the Portal
Prevent Website API Verification Duplicates: Check this box if you want to use Chirp’s default logic to prevent Verified request codes from being duplicated and set the number of days for Chirp to prevent duplicates.
2.4. User Management
User page will list all the users created by you for your entity. Users are essentially your agents or supervisors who are creating and sending requests from your Chirp portal account. The below interface will be displayed when you click on “User” menu.
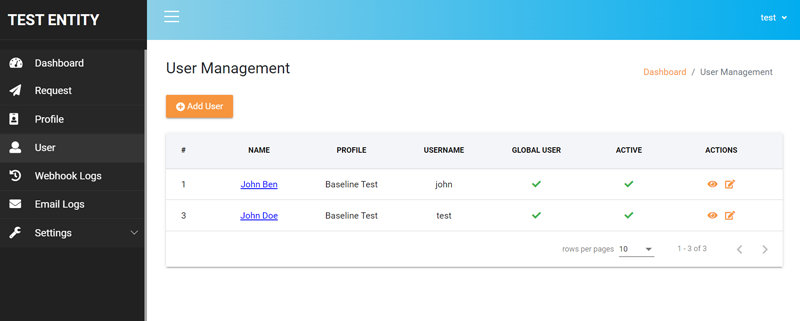
Figure 40: User Listing
2.4.1. View User
You can click on the name of the user to view the details of the user as depicted in the below interface. There will be options to deactivate the selected user, resend activation email to the user and to change login password for the user.
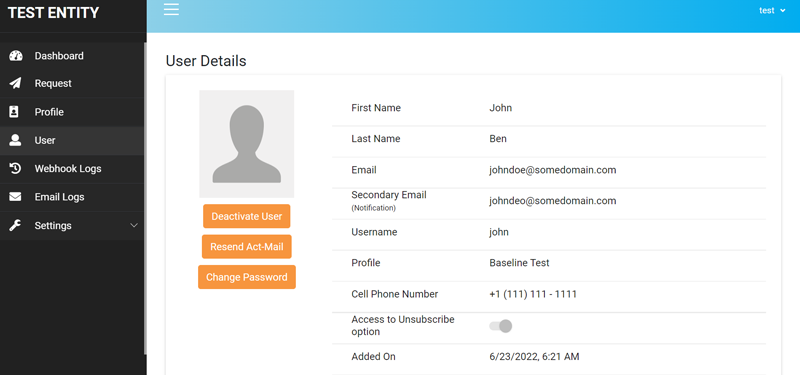
Figure 41: User Details Page
2.4.2. Add User
Chirp contains four Profile User Roles:
-
“Global User” - A user in this role has access to
- Create and manage IFV requests for all Profiles in the Entity
-
“Local User” - A user in this role has access to
- Create and manage IFV requests only for the assigned Profile
-
“Invoice User” - A user in this role has access to
- View dashboard and invoice details of the Entity
-
“Manager” - A user in this role has access to
- Create submit requests for adding additional Profiles to an Entity.
- Create Profile Users
- Create and manage IFV requests for all Profiles in the Entity
You can click on “Add User” button to add a new user. The following interface will appear.
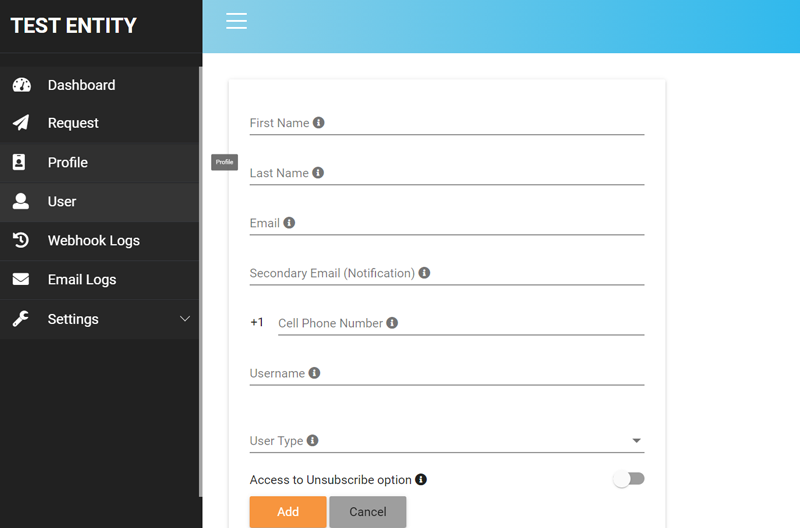
Figure 42: Add User
Enter First Name, Last Name, Email, Cell Phone number and Username for the user you are adding. Select the profile to which you want to associate the user with. Then select the User Type, whether the user is a Global user , a Local user or an Invoice user.
Once done, click on “Add” button to create the user. An email notification will be sent to the user with instructions to get access to his/her Chirp portal account.
2.5 Data Maintenance
2.5.1 Blocked Banks
Banks can be added or removed from the Data Maintenance menu to restrict them for their customers in the Instant Financial Verification process.
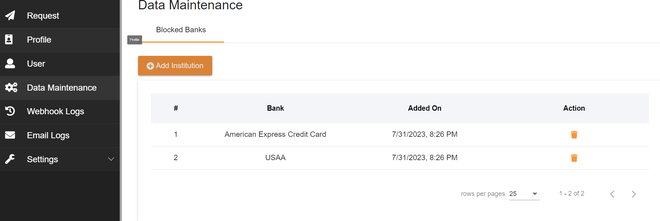
Figure 43: Blocked Banks
New banks to restrict can be added by clicking the Add Institution button where a pop up with the list of banks is presented for selection.
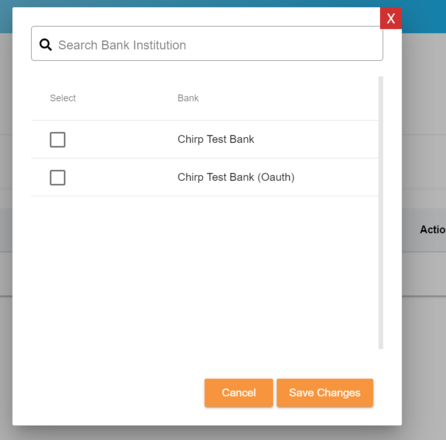
Figure 44: Search Bank Institution
2.5.1.1 Redirection for blocked bank flow
A redirect url can be configured for the blocked banks workflow for each profile in the section shown below

Figure 45: Redirect URL for unsupportedbank
A prompt is presented for the end customer if a blocked bank is selected with Yes or No options to act accordingly as given in the image below. If the customer does not want to select another bank other than the blocked bank, the customer is redirected to the configured url with the requestCode appended.
Below is an example of the redirected url for a url which is configured as https://somedomain.com/bank-blocked.aspx
Example redirected url - https://somedomain.com/bank-blocked.aspx?requestCode=QLU0GU
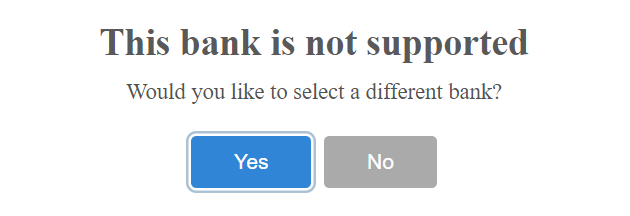
Figure 46: Unsupportedbank Popup
2.5.1.2 Notification via webhook for blocked bank flow
A notification can be configured for the blocked bank flow as given in the documentation here[ADD_LINK]. A notification is sent via webhook or email if a customer selects a bank that is blocked by the entity as per the entity’s webhook configuration.
2.6. Invoice Page
The Invoice page will list all the monthly invoices in a grid view format displaying the Invoice Number, Entity Name, Status, Due Date, No of Requests, $ Amount and Invoice Period. You can click on the Invoice number to see the detailed invoices. There is also an option to download the invoice in PDF format from the Invoice Details Page the invoice.
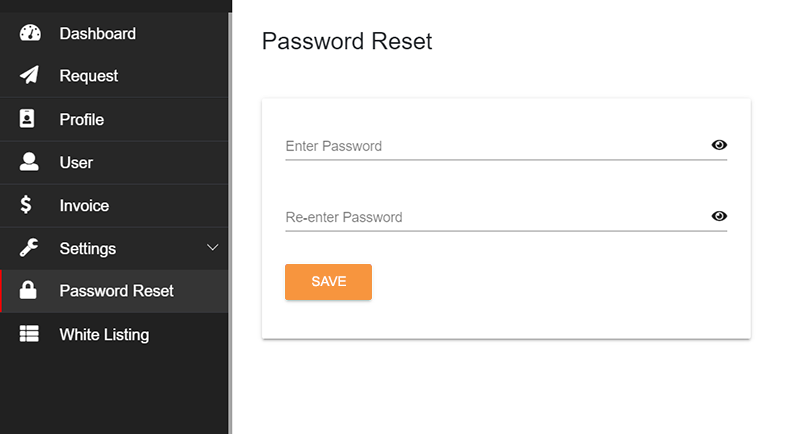
Figure 47: Invoice Listing Page
3. Settings
Settings will have the following options for entity admins
Password Reset – Option to reset user’s own password. This option is available for all entity users.
API Settings – This option is available only to entity admins if API Access is enabled for the entity.
Whitelist IP – Option to whitelist IP Address of users and define access timings. This option is available only for entity admins.
Email Template – Option to customize e-mails that are sent to customers along with the verification link. This option is available on-request and visible only to entity admins.
3.1. Password Reset
To reset your login password, simply navigate to Password Reset page. Enter the new password, re-enter the same password and click on Save button. Your password will be reset.
Figure 48: Password Reset
3.2. API Settings Page
Please refer to Chirp API Guide The API Guide provides detailed instructions on using Chirp API for integrating Chirp services with your system.
3.3. Whitelist IP
IP Address whitelisting can be configured both for Chirp Portal Access and Chirp API Access.
3.3.1 Portal
This page allows entity admins to whitelist IP Address of their users and to define the timings for access. By this way, entity admins can restrict users from access their Chirp Account and Customer data from outside their premises.
Below interface depicts the Whitelist IP Page that displays all the IP Addresses that are whitelisted.
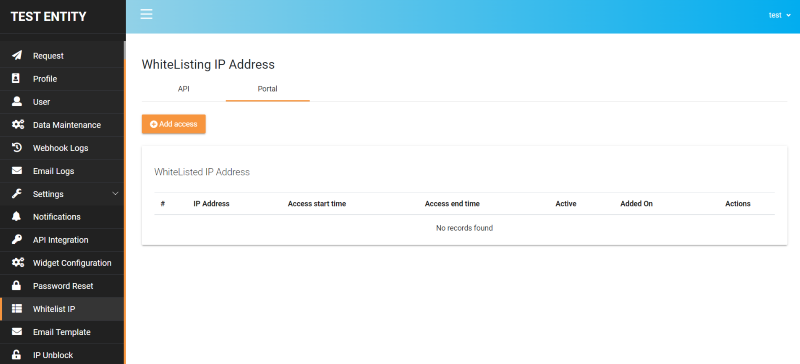
Figure 49: IP Whitelists
To add a whitelisted IP Address, click on “Add access” button and the following interface will appear. Select the Start Time and End Time of day when the access is to be provided and enter the IP Address. Click on Save button to save this whitelist. You can make this whitelisting rule enable or disable by selecting the “Active” checkbox.
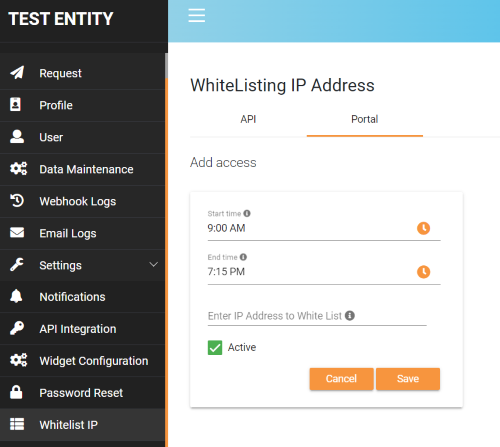
Figure 50: Add IP Whitelist Rule
3.3.2 API
To whitelist an IP login to the Portal as the Entity admin and request an ip to whitelist under the WhiteListing menu API. The requested IP will be approved or denied by chirp and you can see the approved whitelisted IP list from the table. Please refer to the screenshot below for further assistance.
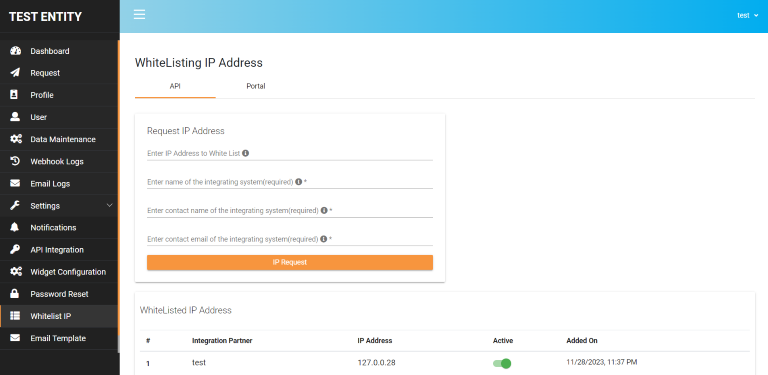
Figure 51: Managing IP Whitelisting
3.4. Email Template
This feature is available for entity admins on-request. From this interface, entity admins can change the content of the e-mail that are sent out to their customers.
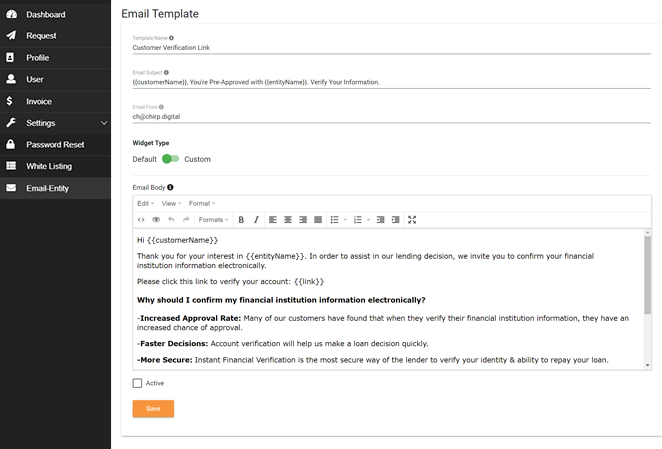
Figure 52: Email Template
3.5. Custom Customer Messages in ChirpLink™ Request Widget
Chirp offers the flexibility for Chirp Entities to customize messages displayed to customers during the verification process.
-
Navigate to Custom Message
- Click on the "Settings" in the sidebar menu.
- Within the Settings page, locate and click on the "ChirpLink™" section.
- Within the ChirpLink™ section, you'll find the "Custom Message" tab.
-
Custom Messages
- Select the profile to update the custom message
- Select the Status to update connected, rejected and expired
- Populate the text area with the custom message corresponding to the selected status.
-
Placeholders for the Custom Message
Identify the placeholders you want to include in your message. These placeholders will be replaced with actual values when the message is displayed to customers.
- {{profileName}}: The name of the profile associated with the request code.
- {{entityName}}: The entity name associated with the request code.
- {{requestCode}}: The unique identifier of the request code.
- {{supportPhoneNumber}}: The support phone number listed on the Entity or Profile. If not set, it defaults to "NA".
- {{supportEmail}}: The support email listed on the Entity or Profile. If not set, it defaults to "NA".
- {{supportTextNumber}}: The support text number listed on the Entity or Profile. If not set, it defaults to "NA".
Placeholders:
-
Displaying the Custom Message
- When a request code reaches an end state (connected, rejected, or expired), the corresponding custom message is displayed to the customer.
- If a custom message is not configured the Chirp default message for that status will be displayed.
-
Chirp Default Message
The default message shown to the end customer in the verification widgets for each statuses are given below
- Connected Status: Successfully connected! Please contact <profileName> at <phoneNumber> or text at <textNumber> with questions. You can close this window
- Rejected Status: Request code <requestCode> is rejected! Please contact <profileName> at <phoneNumber> or text at <textNumber> with the request code for further assistance.
- Expired Status: Request code <requestCode> is expired! Please contact <profileName> at <phoneNumber> or text at <textNumber> with the request code for further assistance.
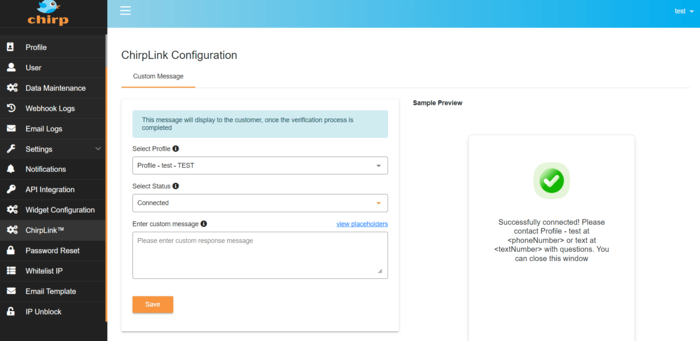
Figure 53: Custom Message
3.6. Custom Request Details Template
The Custom Request Details Template feature allows a customization response to be created in conjunction with the getCustomRequestDetails endpoint. Templates can be modified in the Portal under Settings > API Integration > Custom Request Details Template tab in the main window. You can add, review, modify or remove templates as needed. Each template name must be unique, and checkboxes are used to select specific fields to be included in the response.
*Important to note – The template name specified here will need to be used when calling the getCustomRequestDetails endpoint.
3.6.1. Accessing Custom Request Details Template
To access the Custom Request Details Template feature, follow these steps:
- Navigate to the Portal
- Expand the Settings in the left-hand navigation menu
- Select API Integration in the left-hand navigation menu
- Select the “Custom Request Details Template” in the main window
3.6.2. Managing Templates
In this section, manage templates like:
- Default View: See a list of existing templates.
- Add Template: Create a new template by providing a unique name and selecting the desired fields that you would like to include in the response.
- Modify Template: Edit an existing template's name or fields to include in the response.
- Delete Template: Remove a template from the list.
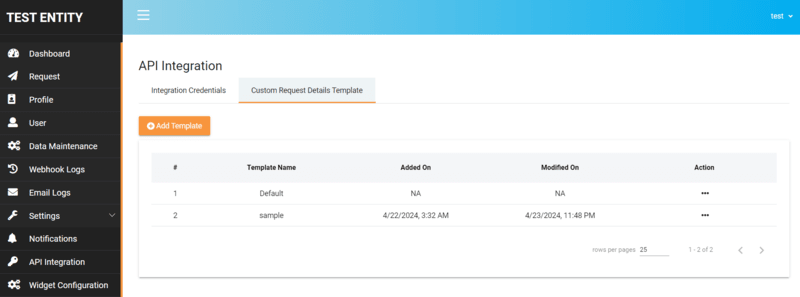
Figure 54: View Templates
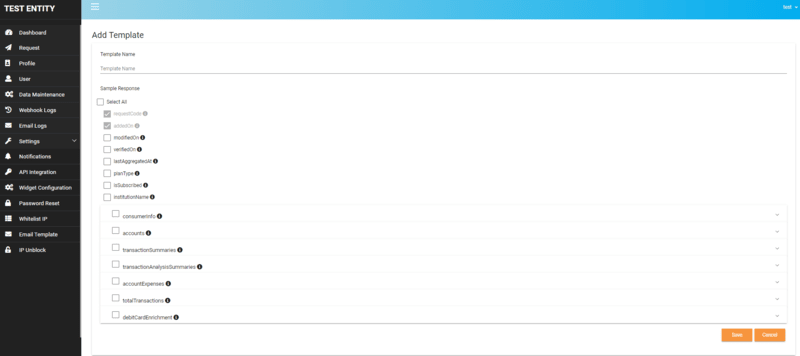
Figure 55: Add Template
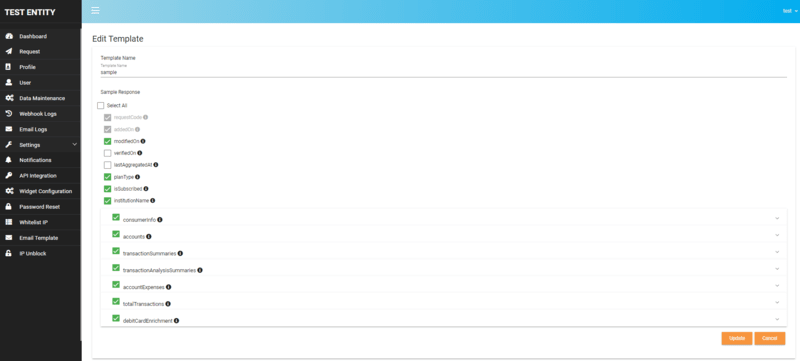
Figure 56: Modify Template
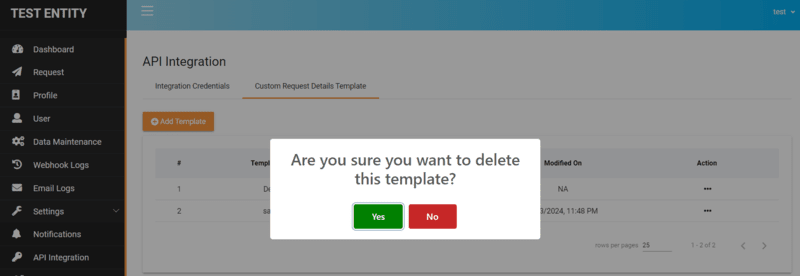
Figure 57: Delete Template
3.6.3. Template Creation Guidelines
When creating or modifying templates:
- Unique Name: Each template must have a unique name to avoid conflicts.
- Response Selection: Select the checkboxes to indicate which fields should be included in the response.
4. Contact Information and Support
For questions, feedback or support implementing Chirp please contact your account manager or contact us at [email protected] or webform .